Tag

DIY Archives - Gurlinterrupted

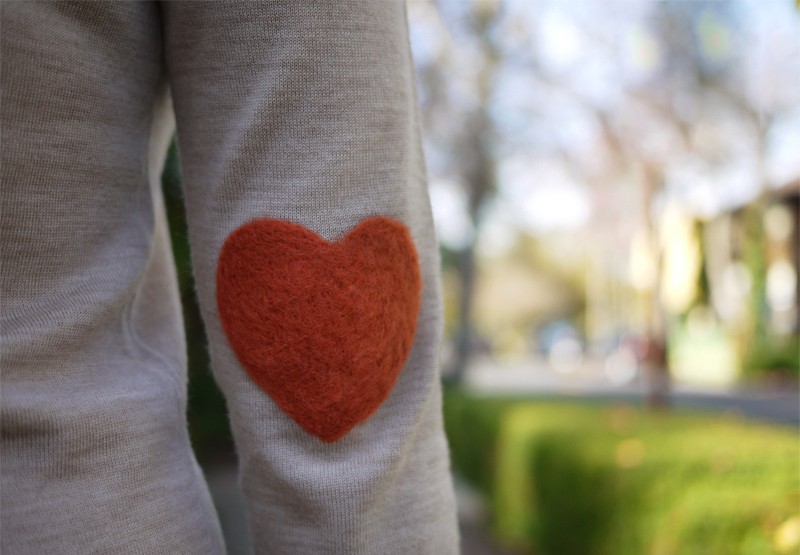
FASHION DIY: Needle Felting Heart Elbow Patches

fashion, DIY, Elbow Patches, Needle Felting, How To, Tutorial, fashion blog nz, style blog nz, beauty blog nz, New Zealand PR, beauty media, fashion media, angie fredatovich, sweater, heels, clothes

I stumbled (literally – I love ‘Stumbleupon.com’) across this Heart Elbow Patch DIY tutorial by Erica of ‘honestlyWTF’ a couple of years ago and I’m determined to do this with one of my jumpers before winter comes to an end. I mean hey – all it entails is repeatedly stabbing a needle up and down into a piece of fabric, heck yes I can do that. Here’s Erica’s ‘how to’ and exactly; what I plan to do myself this weekend!
fashion, DIY, Elbow Patches, Needle Felting, How To, Tutorial, fashion blog nz, style blog nz, beauty blog nz, New Zealand PR, beauty media, fashion media, angie fredatovich, sweater, heels, clothes

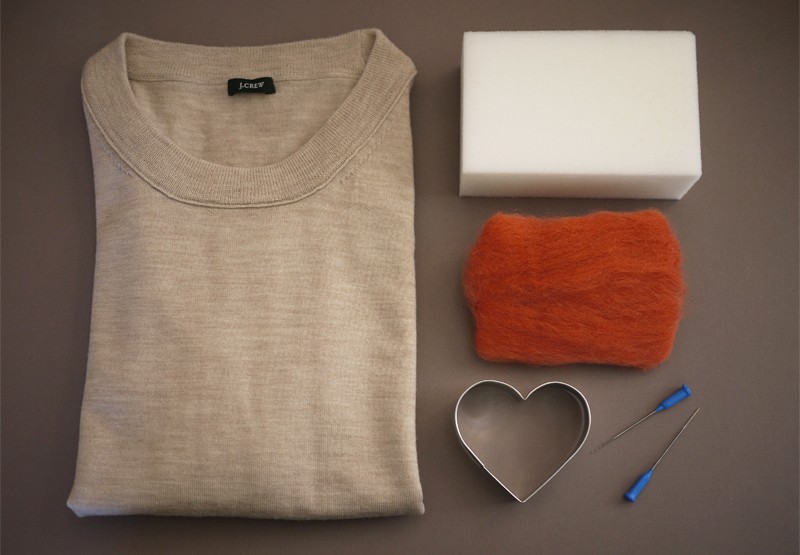
Here’s what you’ll need (most of which you can get from Spotlight or The Warehouse)

  • wool sweater
  • 36 gage felting needle
  • piece of dense foam cut to size (or a needle mat)
  • some wool roving
  • a 3” (or thereabouts) cookie cutter
  • an iron

fashion, DIY, Elbow Patches, Needle Felting, How To, Tutorial, fashion blog nz, style blog nz, beauty blog nz, New Zealand PR, beauty media, fashion media, angie fredatovich, sweater, heels, clothes

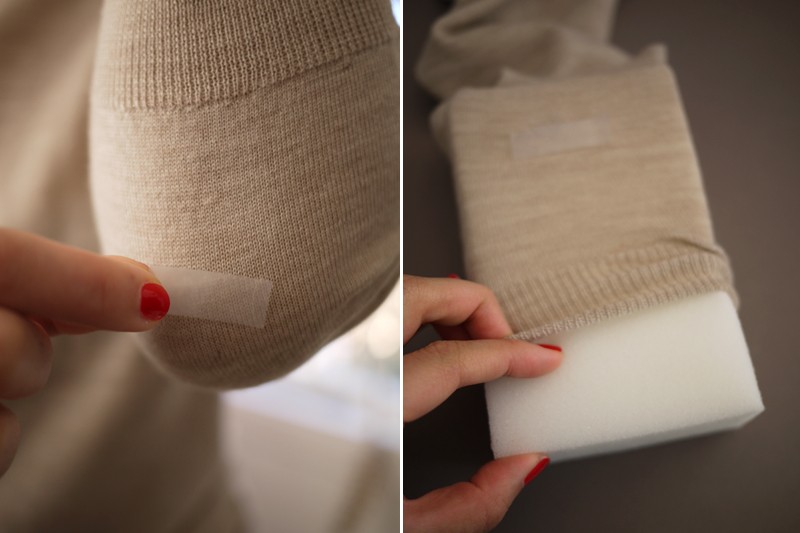
With the sweater on, place a piece of tape about half an inch below the elbow. Do the same with the opposite elbow. Remove the sweater and insert the foam block into one of the sleeves.
fashion, DIY, Elbow Patches, Needle Felting, How To, Tutorial, fashion blog nz, style blog nz, beauty blog nz, New Zealand PR, beauty media, fashion media, angie fredatovich, sweater, heels, clothes

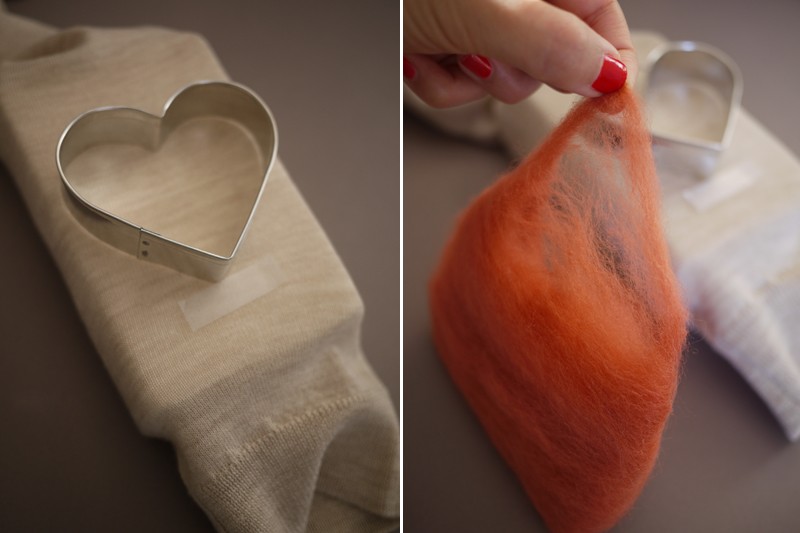
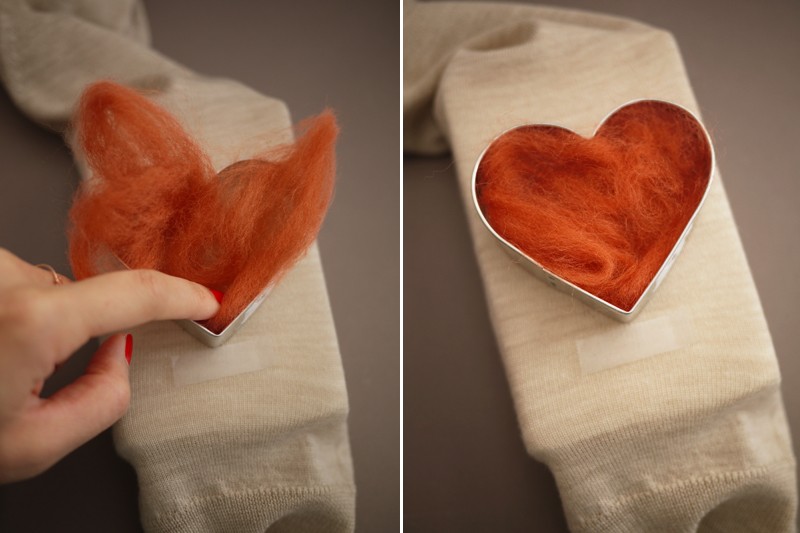
Align and centre the bottom of the cookie cutter along the top of the tape. Pinch off a few tufts of wool roving.
fashion, DIY, Elbow Patches, Needle Felting, How To, Tutorial, fashion blog nz, style blog nz, beauty blog nz, New Zealand PR, beauty media, fashion media, angie fredatovich, sweater, heels, clothes

Fill the cutter, spreading out the wool fibres evenly.
fashion, DIY, Elbow Patches, Needle Felting, How To, Tutorial, fashion blog nz, style blog nz, beauty blog nz, New Zealand PR, beauty media, fashion media, angie fredatovich, sweater, heels, clothes

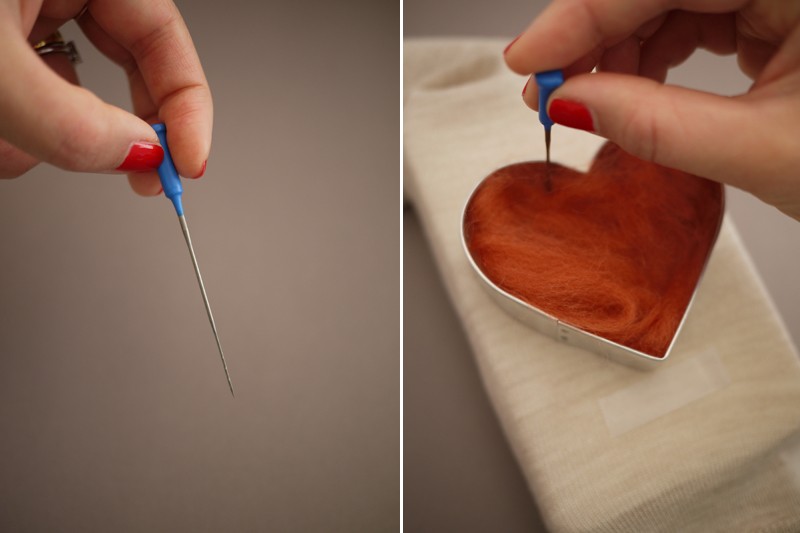
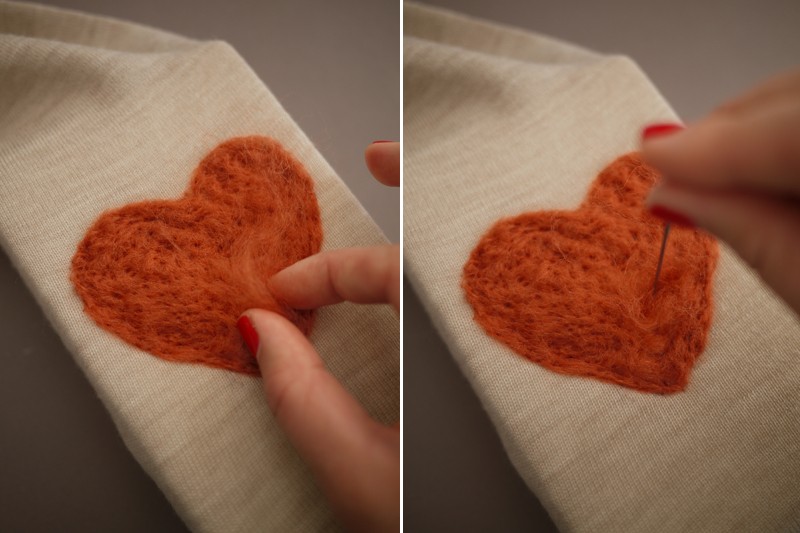
At the base of all felting needles are tiny, sharp burrs, which grab and interlock the wool fibres. While holding the needle vertically, repeatedly stab it into the wool roving and through the sweater. I found it easier to work around the outer perimeter of the cutter first and then work my way inwards. Important tip: To prevent breaking the needle, always keep the needle upright and never at an angle. And don’t forget to pay careful attention to your fingers while felting as the needle is extremely sharp!
fashion, DIY, Elbow Patches, Needle Felting, How To, Tutorial, fashion blog nz, style blog nz, beauty blog nz, New Zealand PR, beauty media, fashion media, angie fredatovich, sweater, heels, clothes

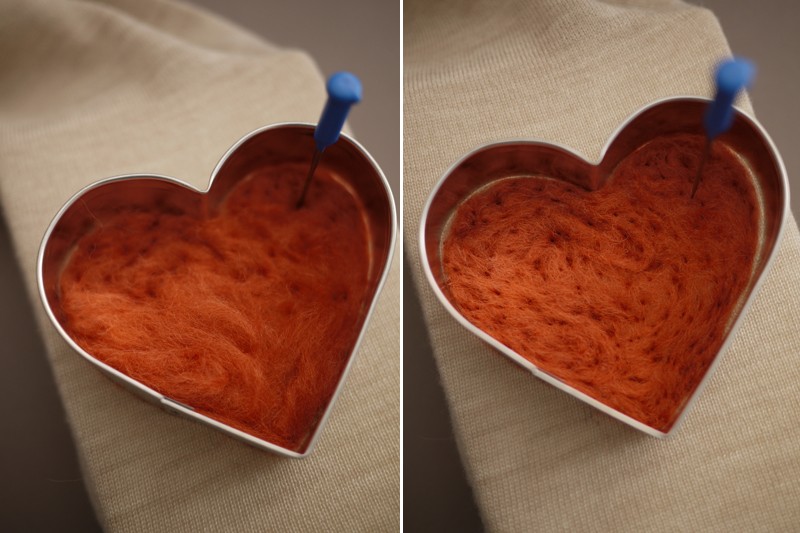
Continue stabbing away until the surface is flat and even. Fun, right?
fashion, DIY, Elbow Patches, Needle Felting, How To, Tutorial, fashion blog nz, style blog nz, beauty blog nz, New Zealand PR, beauty media, fashion media, angie fredatovich, sweater, heels, clothes

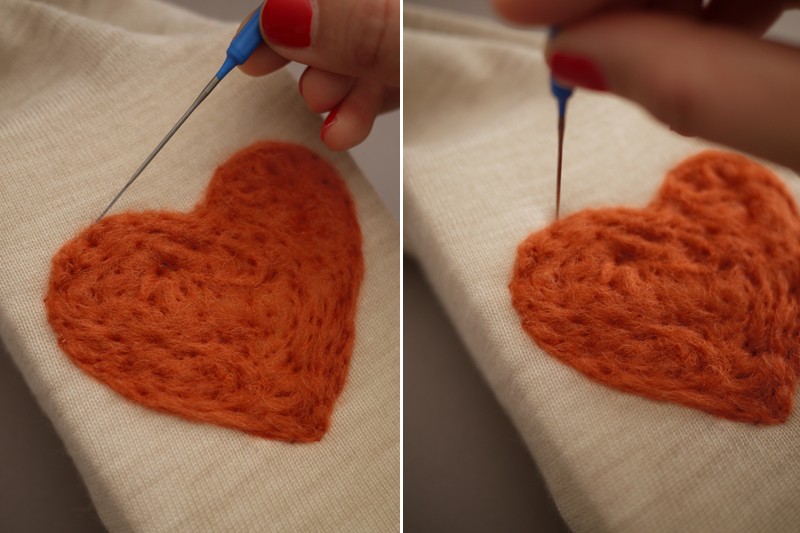
Remove the cutter and use the tip of the needle to reign in any stray fibres, if necessary. Don’t worry about the holes as they will be mended later.
fashion, DIY, Elbow Patches, Needle Felting, How To, Tutorial, fashion blog nz, style blog nz, beauty blog nz, New Zealand PR, beauty media, fashion media, angie fredatovich, sweater, heels, clothes

Patch up any bare or uneven spots by adding more wool roving where needed.
fashion, DIY, Elbow Patches, Needle Felting, How To, Tutorial, fashion blog nz, style blog nz, beauty blog nz, New Zealand PR, beauty media, fashion media, angie fredatovich, sweater, heels, clothes

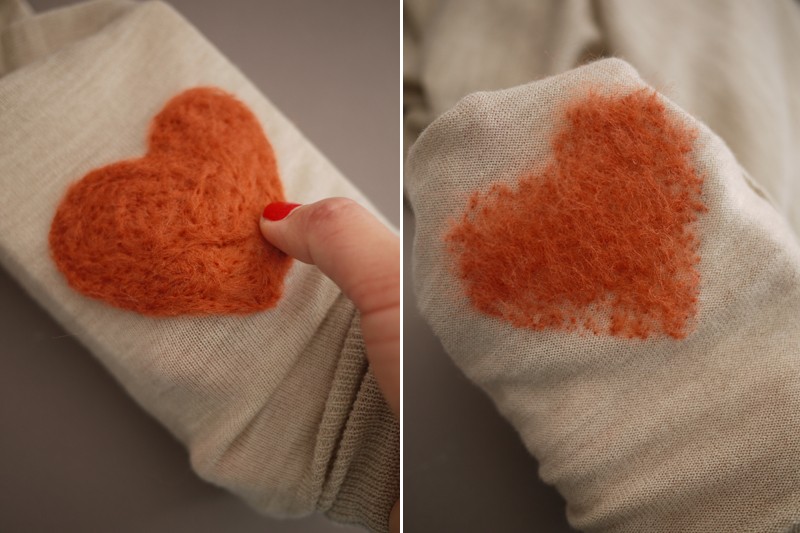
Carefully peel the sweater away from the foam. Notice that the fibres have transferred through to the backside of the sweater.
fashion, DIY, Elbow Patches, Needle Felting, How To, Tutorial, fashion blog nz, style blog nz, beauty blog nz, New Zealand PR, beauty media, fashion media, angie fredatovich, sweater, heels, clothes

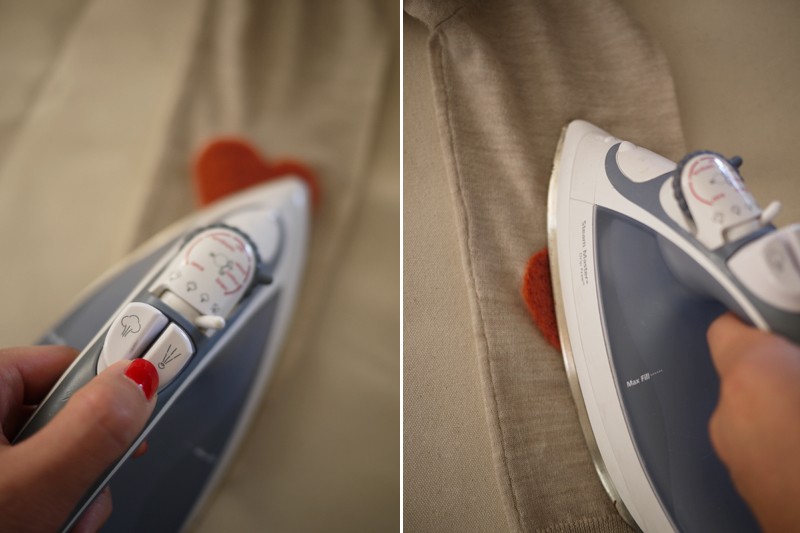
To smooth and set the patch, spritz with water and press with an iron on the wool setting.
fashion, DIY, Elbow Patches, Needle Felting, How To, Tutorial, fashion blog nz, style blog nz, beauty blog nz, New Zealand PR, beauty media, fashion media, angie fredatovich, sweater, heels, clothes

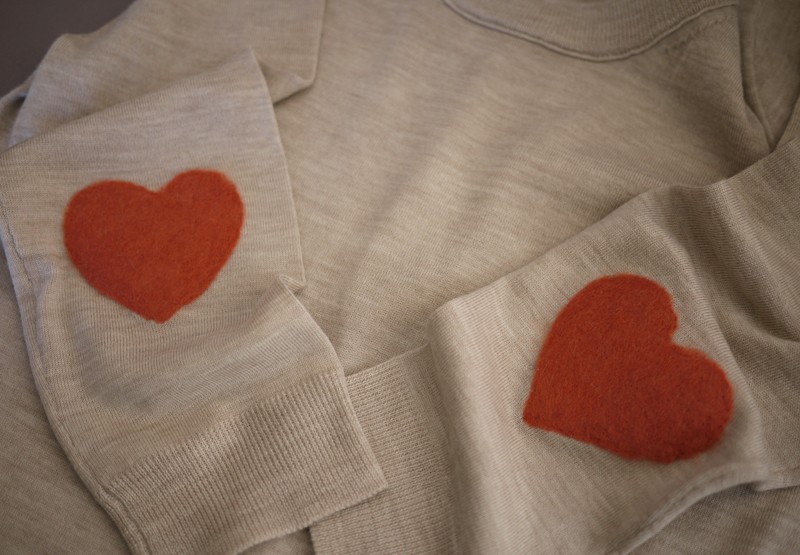
Repeat the same steps the other sleeve.
fashion, DIY, Elbow Patches, Needle Felting, How To, Tutorial, fashion blog nz, style blog nz, beauty blog nz, New Zealand PR, beauty media, fashion media, angie fredatovich, sweater, heels, clothes

Viola! Your heart-shaped elbow patches are finished!
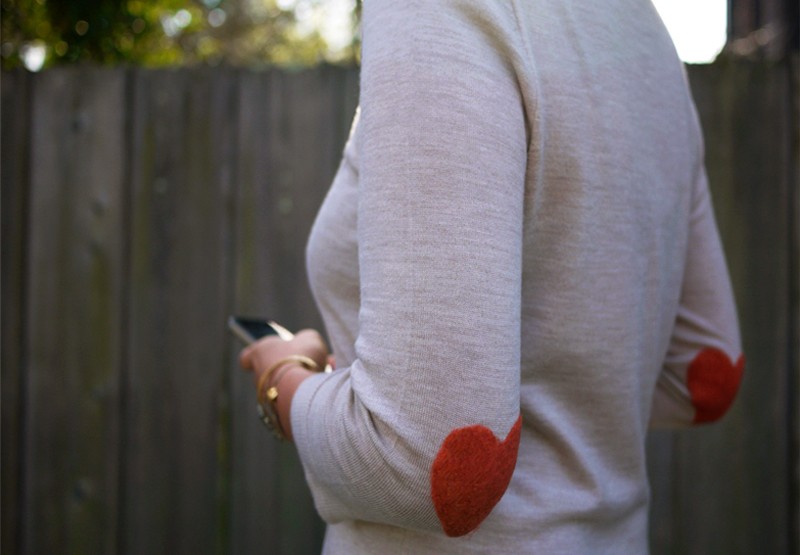
fashion, DIY, Elbow Patches, Needle Felting, How To, Tutorial, fashion blog nz, style blog nz, beauty blog nz, New Zealand PR, beauty media, fashion media, angie fredatovich, sweater, heels, clothes

Ange x
Gurlinterrupted
A Girl Interrupted By Fashion, Beauty & Anything Pretty That Catches My Eye

Gurlinterrupted Facebook, beauty blog nz, fashion blog nz, style blog nz, heels, shoes, clothes,

DIY These Leopard Head Loafers…

DIY, Leopard Loafers, style blog nz, beauty blog nz, Angie Fredatovich, www.gurlinterrupted.com, rubi, loafers, shoes, fashion, style, Angie Fredatovich, gurlinterrupted

A while ago I posted a pic of these loafers on my Facebook page and was immediately inundated with emails, comments and tweets from people asking where they could purchase them from.   Sadly, these loafers aren’t sold here in New Zealand, however you can purchase them from the US and/or online and they range in price anywhere between US$30 to $350.  With that in mind I pondered ‘just how hard could it be to make these?’  The answer – damn easy!

I found the EXACT same leopard head embellishments in K-Mart for just $6.  They’re actually a necklace, but I soon DIY’d these bad boys off their chains and straight onto my shoes.  These are stock-standard necklaces in K-Mart (in the US I’m assuming they are probably in Target) so I know you can still buy them in-store now.  Then I grabbed 2 for $25 loafers from Rubi and I was good to go!

Here’s a step by step guide to making your own ‘leopard head loafers’ just in time for winter.  I do love a good pair of loafers in winter!

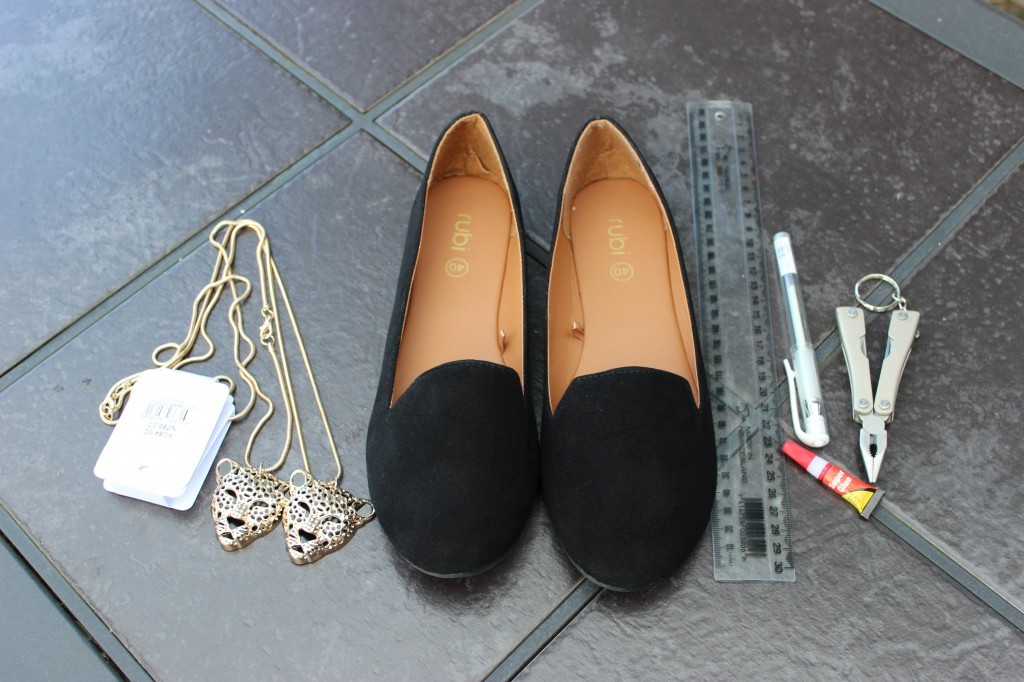
Here’s what you’ll need:
Leopard Embellishments
Loafers/Ballet flats
A Marker Pen (I used a white marker from Typo, as it’s white it’s easier to see on black fabric)
Super Glue
A Ruler
Pliers

DIY, Leopard Loafers, Angie Fredatovich, www.gurlinterrupted.com, rubi, loafers, shoes, fashion, style

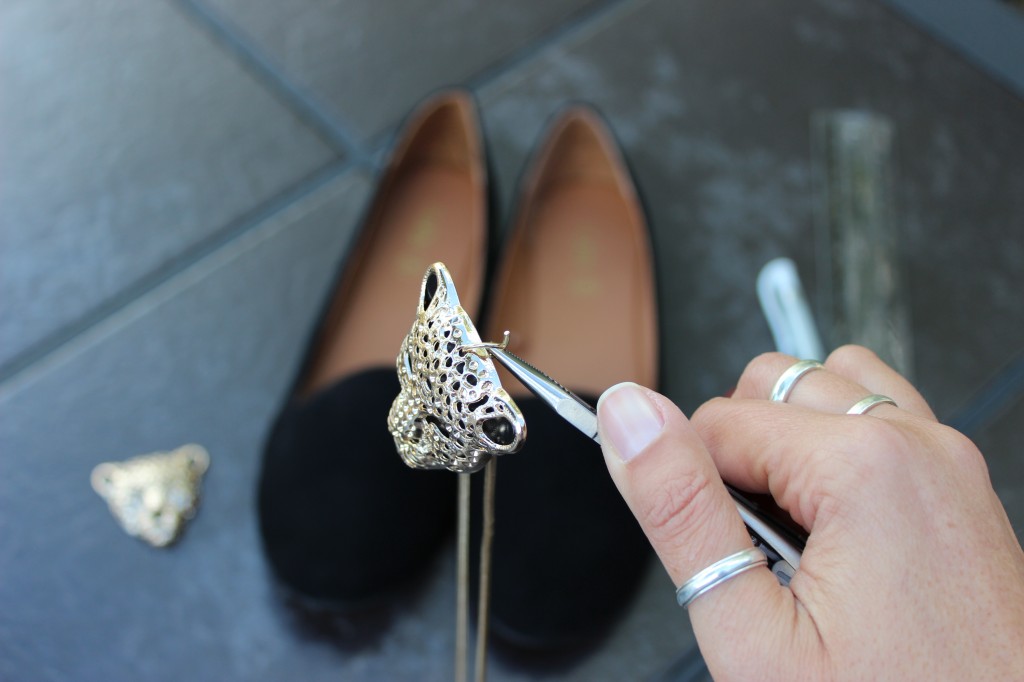
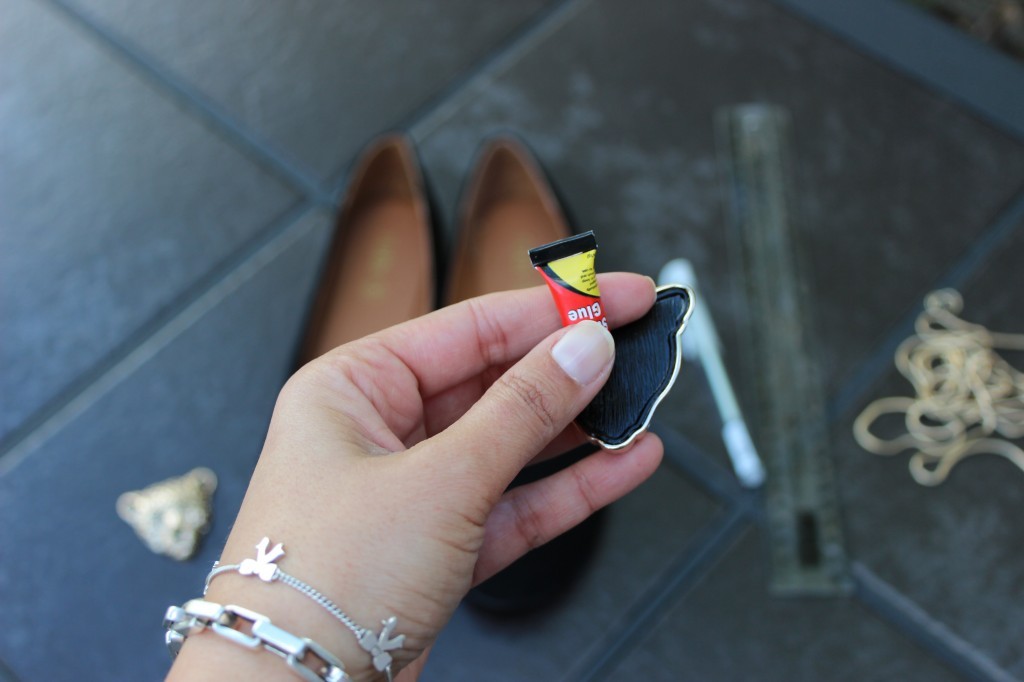
1. Remove leopard embellishment from chain with pliers

DIY, Leopard Loafers, Angie Fredatovich, www.gurlinterrupted.com, rubi, loafers, shoes, fashion, style blog nz, fashion blog nz,

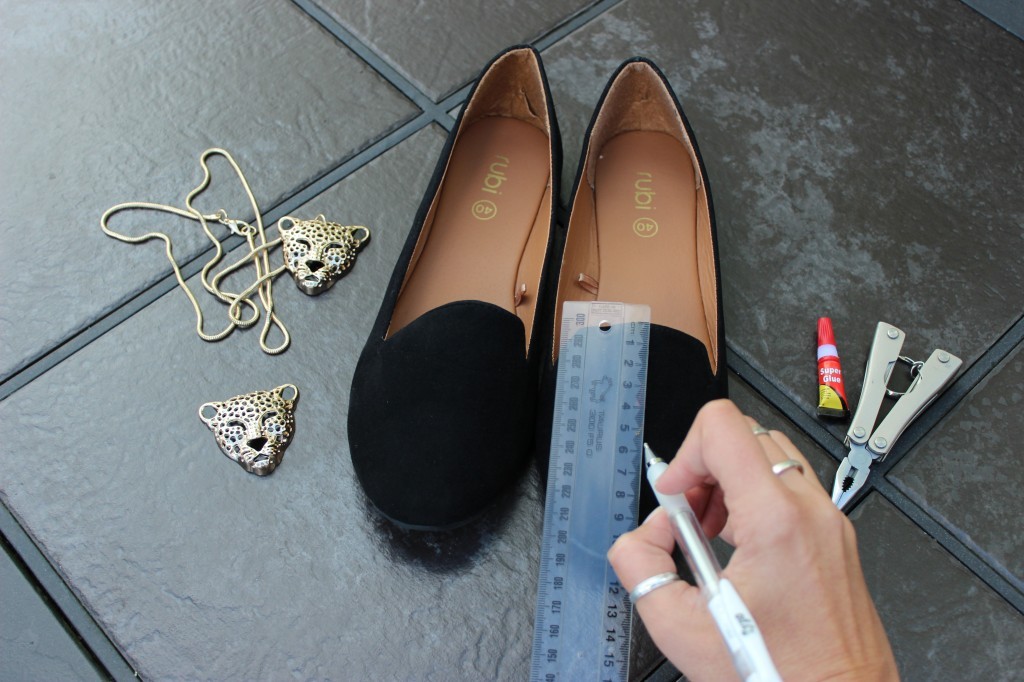
2. Mark out on each shoe where you want the embellishment to sit (this way you can ensure it sits evenly on both shoes)

DIY, Leopard Loafers, Angie Fredatovich, www.gurlinterrupted.com, rubi, loafers, shoes, fashion, style blog nz, fashion blog nz,

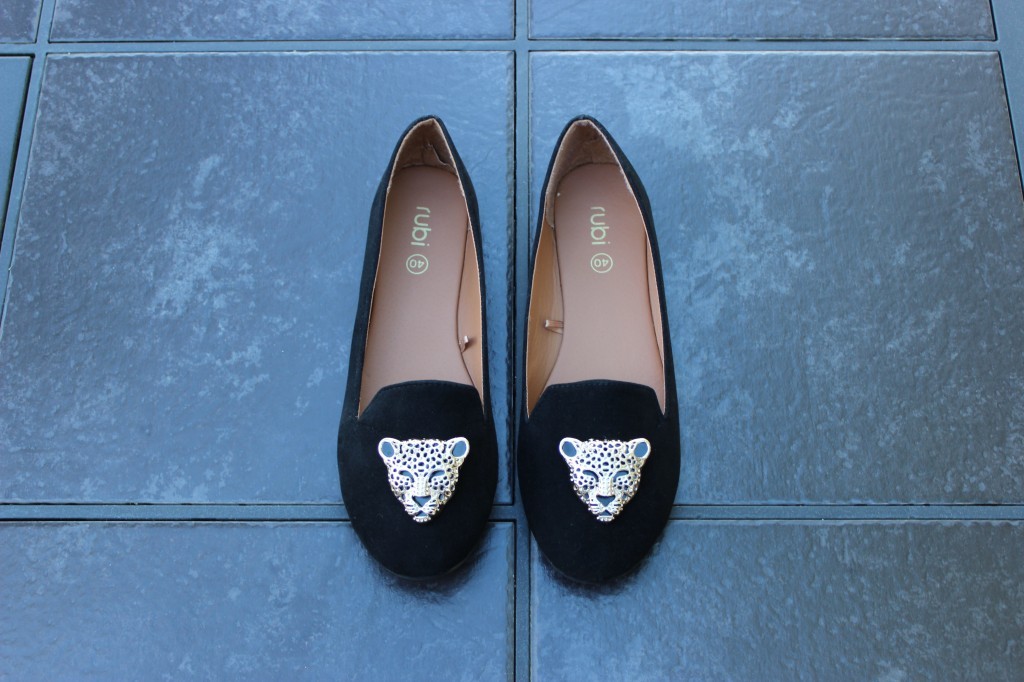
3. Attach the embellishments directly onto your shoes

DIY, Leopard Loafers, Angie Fredatovich, www.gurlinterrupted.com, rubi, loafers, shoes, fashion, style blog nz, fashion blog nz,

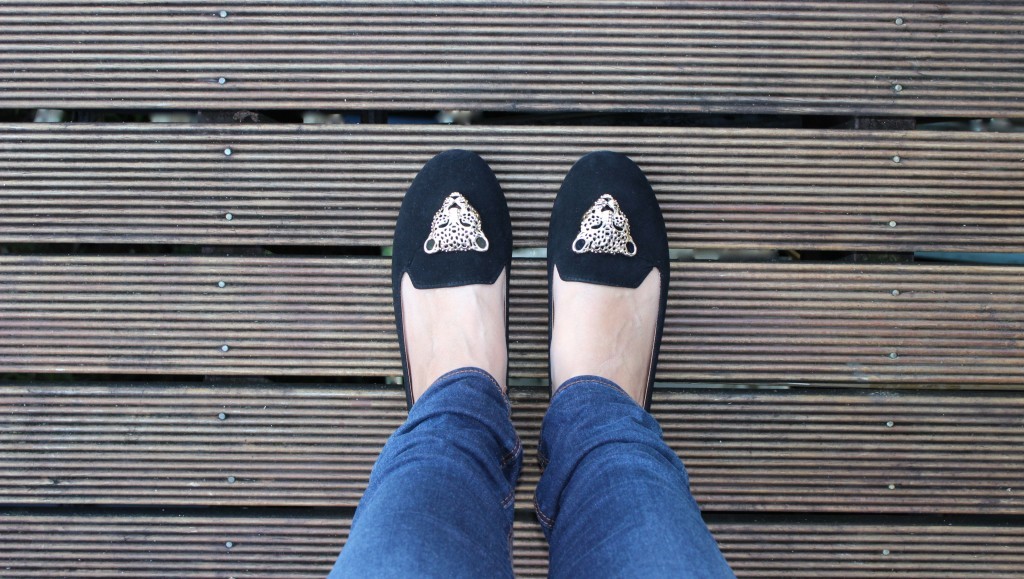
Viola – you’re done.  Pretty cute loafers for under $40

DIY, Leopard Loafers, Angie Fredatovich, www.gurlinterrupted.com, rubi, loafers, shoes, fashion, style blog nz, fashion blog nz,

Now, I didn’t add the gold embellishment to the tips of the shoes as shown in the original photo (thats just personal preference) however if you wanted to do this you could, as they have the gold tips available at Spotlight and you can just attach those with super glue as well.

DIY, Leopard Loafers, Angie Fredatovich, www.gurlinterrupted.com, rubi, loafers, shoes, fashion, style blog nz, fashion blog nz,

Ange x
Gurlinterrupted
A Girl Interrupted By Fashion, Beauty & Anything Pretty That Catches My Eye
Don’t forget to ‘Like’ Gurlinterrupted on FACEBOOK and follow my blog by entering your email address on the homepage here on my site.

Does Your Keyboard Need A Makeover?

WASHI TAPE KEYBOARD nz style beauty blogger

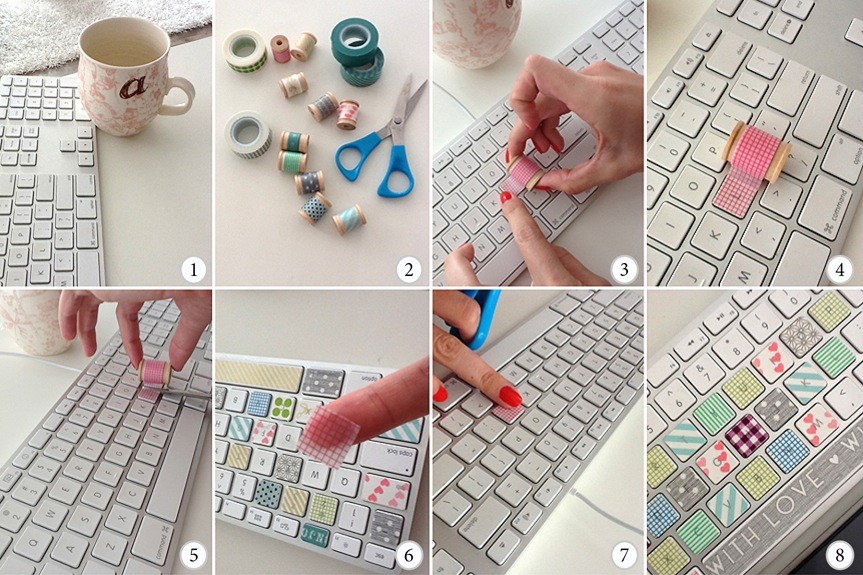
I know washi tape has been around for quite some time now and yes, admittedly I’ve given more than ‘just a few’ of my household and office items a washi tape makeover, but this ‘Keyboard Makeover’ I found on designaglow.com is pretty much THE coolest thing I’ve ever seen done with washi tape and I’m about to apply this to my MacBook Pro, the office Mac, my sisters laptop, my guys desktop Mac (he doesn’t know this yet – probably best I make it a ‘surprise makeover’ when he’s not home, unsure he will be as delighted with this cutesy makeover as I am).

Check out this super easy step-by-step guide:

Washi Tape Keyboard Tutorial NZ Style Blogger

Source: designaglow.com

Supplies: 
1. Washi tape: you can find this at your local craft store or on etsy.com
2. Scissors
3. Keyboard – preferably one with flat keys
4. Time!

Directions:
1. Thoroughly clean keys with rubbing alcohol and a q-tip.
2. Brainstorm a pattern or create a random design.
3. Align edge with corner of key.
4. Unravel and adhere across key.
5. Snip at edge and remove.
6. Trim corners and excess.
7. Neatly re-stick to key.
8. Repeat!

Ange xx

A Girl Interrupted By Fashion, Beauty & Anything Pretty That Catches My Eye
Don’t forget to ‘Like’ Gurlinterrupted on FACEBOOK and follow my blog by entering your email address on the homepage here on my site.

SUPER SIMPLE DIY: How To Make Your Own Matte Nail Polish

DIY- Make Your Own Matte Nail Polish New Zealand Beauty Blogger Angie Fredatovich

Matte nail polish is so on trend right now.  I’m especially addicted to a matte black French mani; and it just so happens that this is THE most simple DIY guide for creating Matte Nail Polish (yup, totally cost-effective too).

Follow these simple steps (and a couple of extra handy hints further below) and you’ll be DIYing your way to a collection of matte polishes in no time.

What you will need:

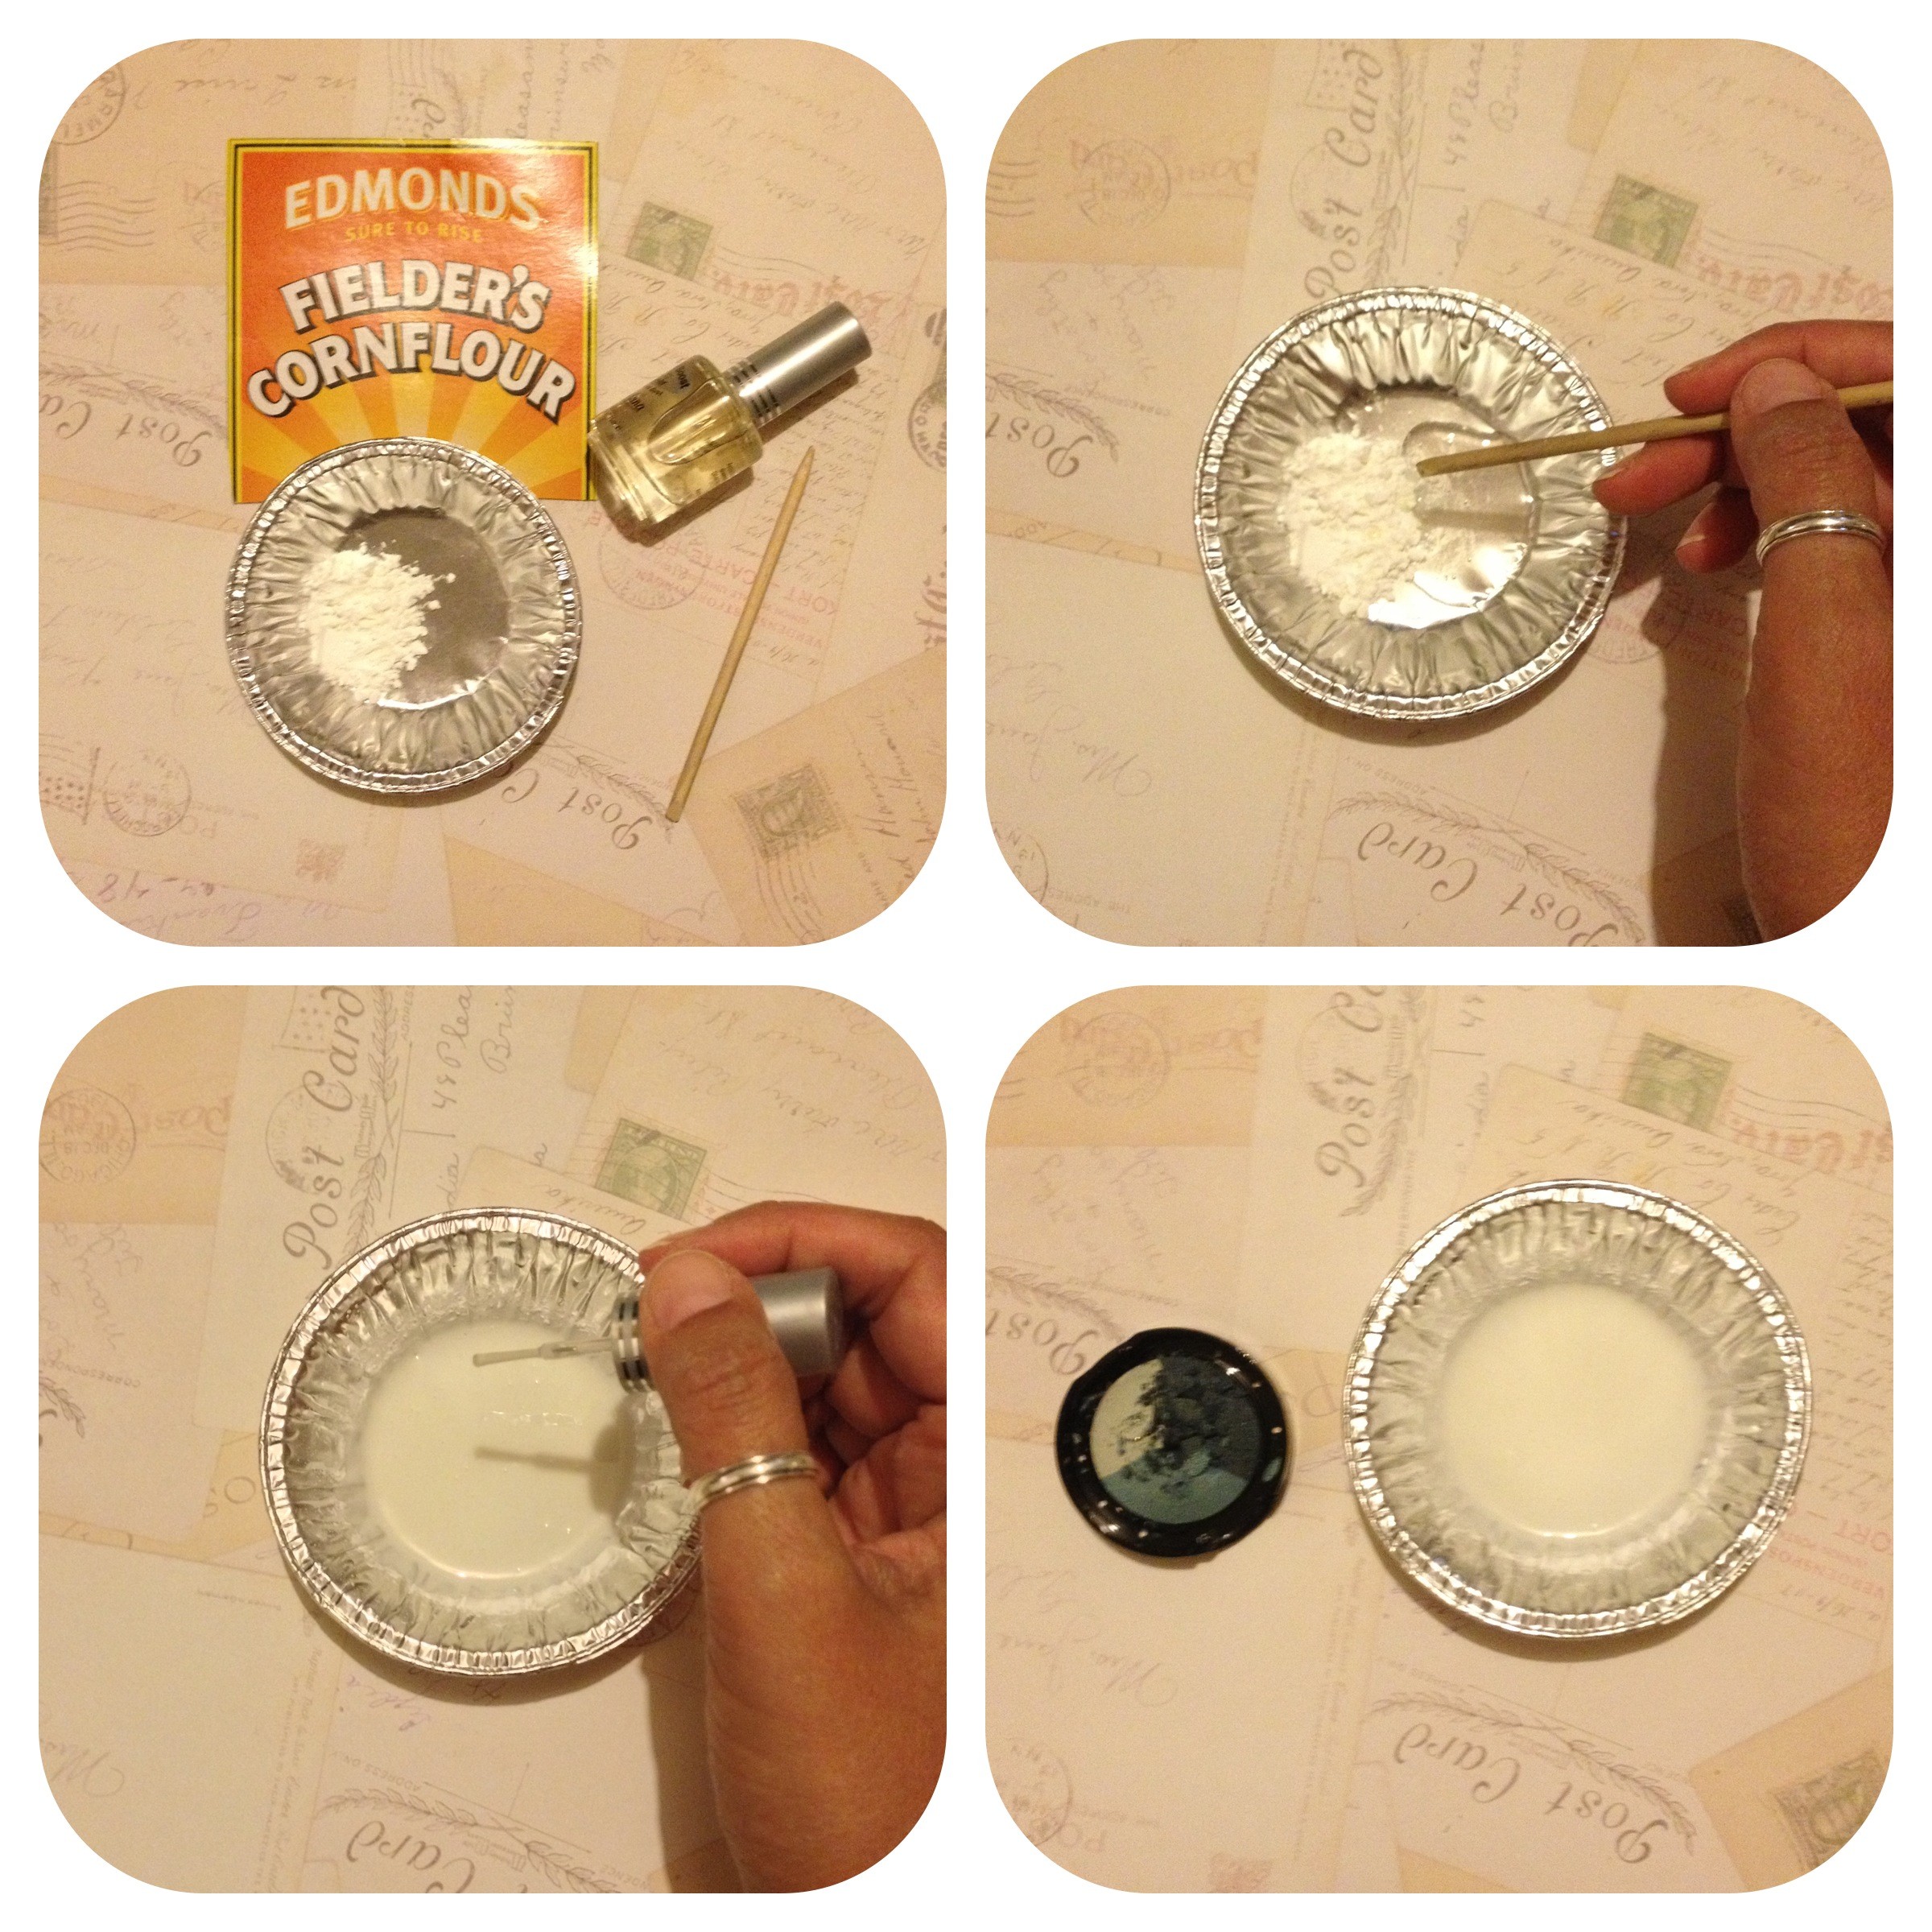
  • A small container for mixing.  I just used a small foil pie dish, of which you can pick a bundle up for a couple of bucks at the $2 store
  • A bottle of nail polish – I’ve used clear in the photo, but you can use any colour you want to turn into a matte polish
  • A stirrer – I find manicure sticks really good, but anything will do
  • Cornflour

DIY- Make Your Own Matte Nail Polish New Zealand Beauty Blogger

Just add equal parts of cornflour and nail polish into a small container, take the stirrer and mix well – yeah, that’s actually it!  You have your own matte nail polish.  Just don’t forget – once you’ve finished using the brush to apply your DIY polish, make sure you clean it with some nail polish remover before inserting it back into the polish bottle.

You will see from my pics, that I’ve used clear polish and this will look a little creamy – don’t worry it will apply pretty much clear (or just add less cornflour if you want super clear) and you can now apply over already painted nails to turn them matte.

Now, just one other super handy hint…  Got an eyeshadow that’s broken or crumbled? (hate it when that happens), well you can actually add eyeshadow to clear polish and it will have a very similar effect to cornflour, although I normally add both the eyeshadow and the cornflour to get a super matte polish with an added pigmented dimension.

You can do this with any nail polish colour at all – it works no matter the colour you add the cornflour to.  Also, as you will see from my matte black French mani pic above, once the matte polish has completely dried, just swipe a line of clear polish over the tips (use removable tape or mani stickers if you’ve not got a steady hand) and voila – matte french mani.

Ange x
A Girl Interrupted By Fashion, Beauty & Anything Pretty That Catches My Eye
Don’t forget to ‘Like’ Gurlinterrupted on FACEBOOK and follow my blog by entering your email address on the homepage here on my site.

Image source: Matte Black French mani http://chloesnails.blogspot.co.nz    DIY Image by www.gurlinterrupted.com

DIY: The Commando-M/Blogger Collab – A Modern Twist On The Oxford.

Commando-M Blogger Collab Kathryn Wilson Shoe Design

Commando-M Blogger Collaboration Kathryn Wilson Shoe Design

As some of you may already know, Commando-M sneakers are about to re-launch! Commando-M were one of the leading New Zealand shoe companies in the 80’s (I’m pretty sure nearly every ‘child of the 80’s’ had a pair of these super cute sneakers) and I’m happy to report – they’re making a comeback!

Commando-M has already collaborated with leading shoe designer Kathryn Wilson and now Commando-M is collaborating with a selection of New Zealand Fashion Bloggers. Gurlinterrupted was lucky enough to be one of those bloggers invited to design a pair of Commando-M’s and you can now see my design and many others, on Commando-M’s Facebook page: COMMANDO-M’s FACEBOOK PAGE

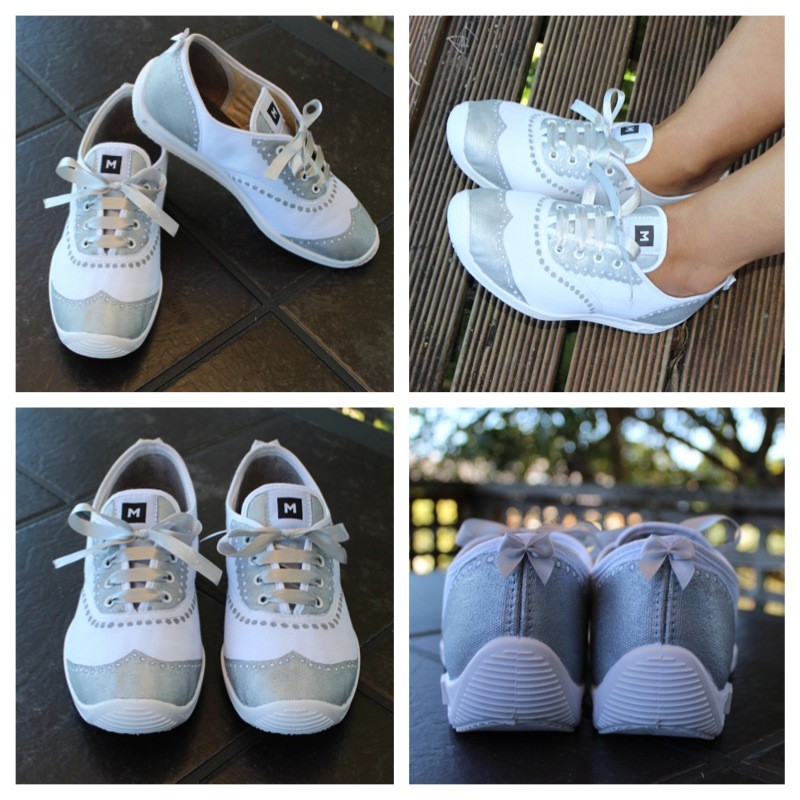
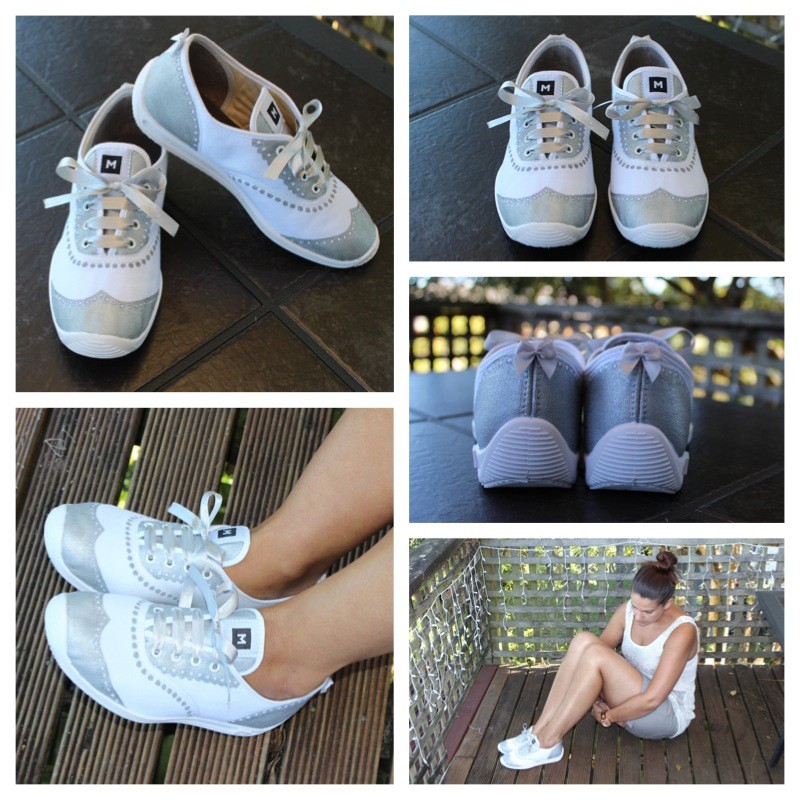
Here’s a simple step by step guide to re-creating my sneaker design – A modern twist on the Oxford.

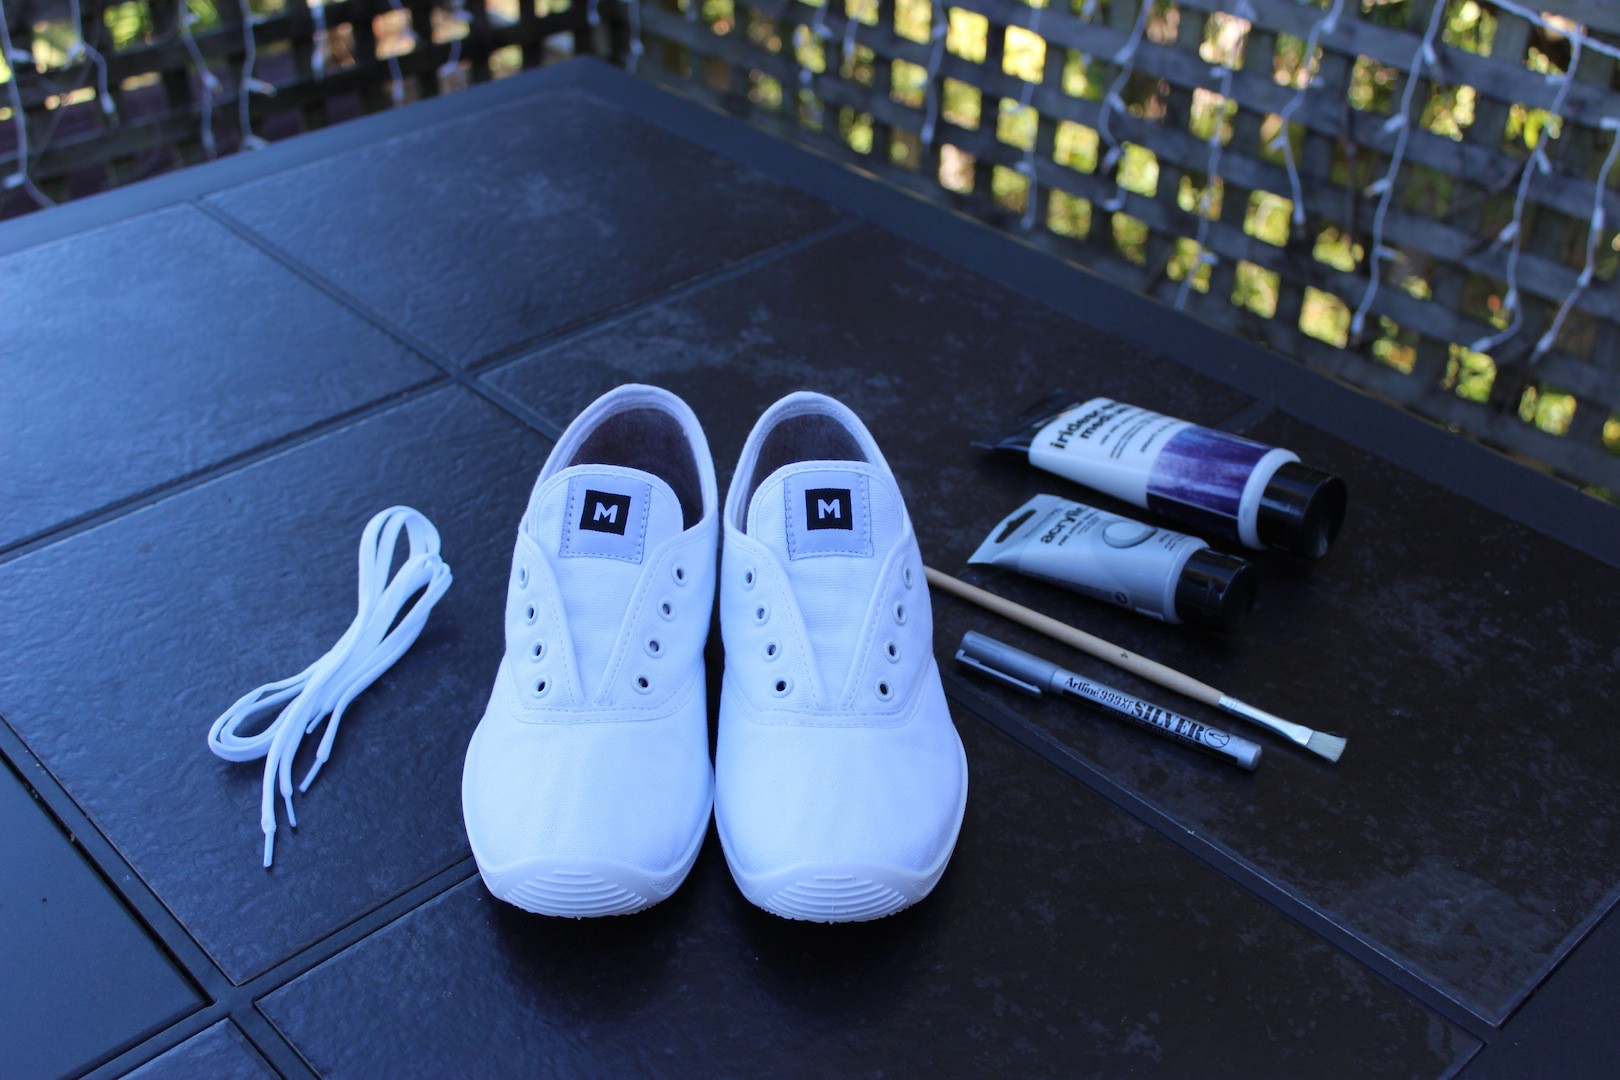
You will need:
A Pair of Sneakers
A Silver Metallic Pen
2 Paintbrushes – A fine and a medium tipped brush
Silver Acrylic Paint
Iridescent Mixing Medium (paint) this will create a true metallic silver paint
A small dish to mix your paints in
Masking Tape
Silver Ribbon
Super Glue

Guide:
Take a pair of white Commando-M’s (or whatever sneakers you are re-designing) and remove the laces.  Here’s a ‘before’ picture of my Commando M’s:
Commando-M Blogger Collab Kathryn Wilson Shoe Design

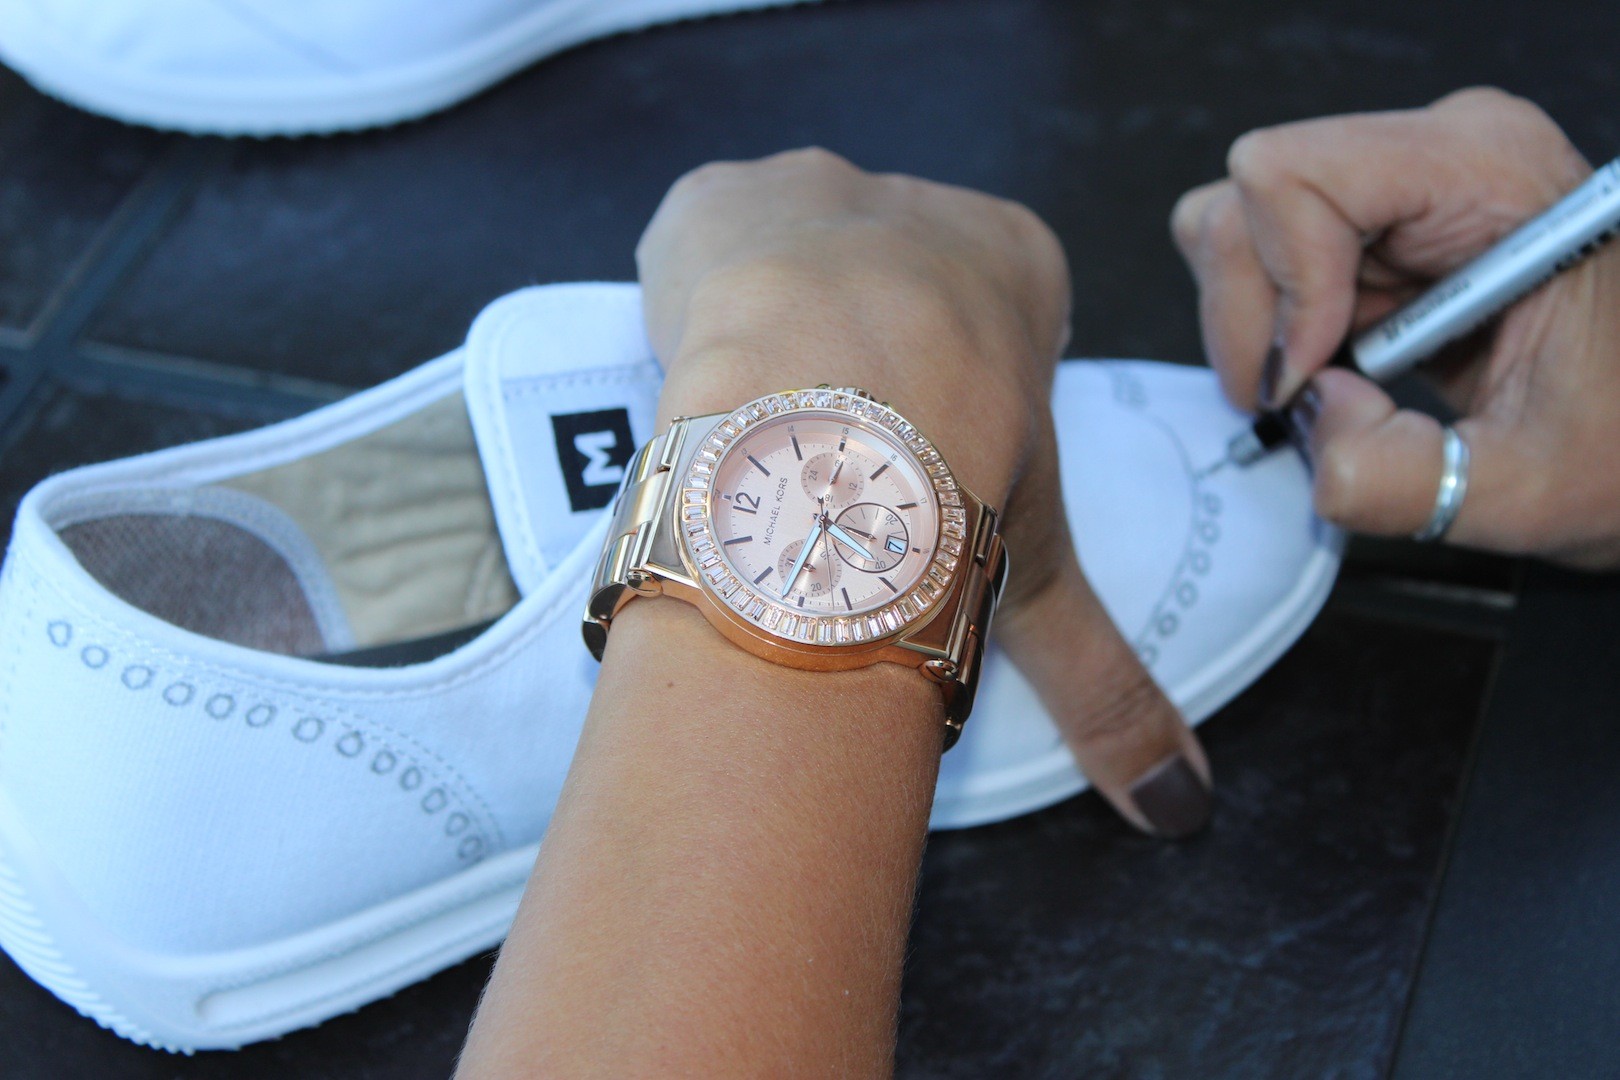
Draw on the design using the Silver Metallic Pen. This will enable you to map out your concept using the same hues as the paint you will be using.
Commando-M Blogger Collab Kathryn Wilson Shoe Design

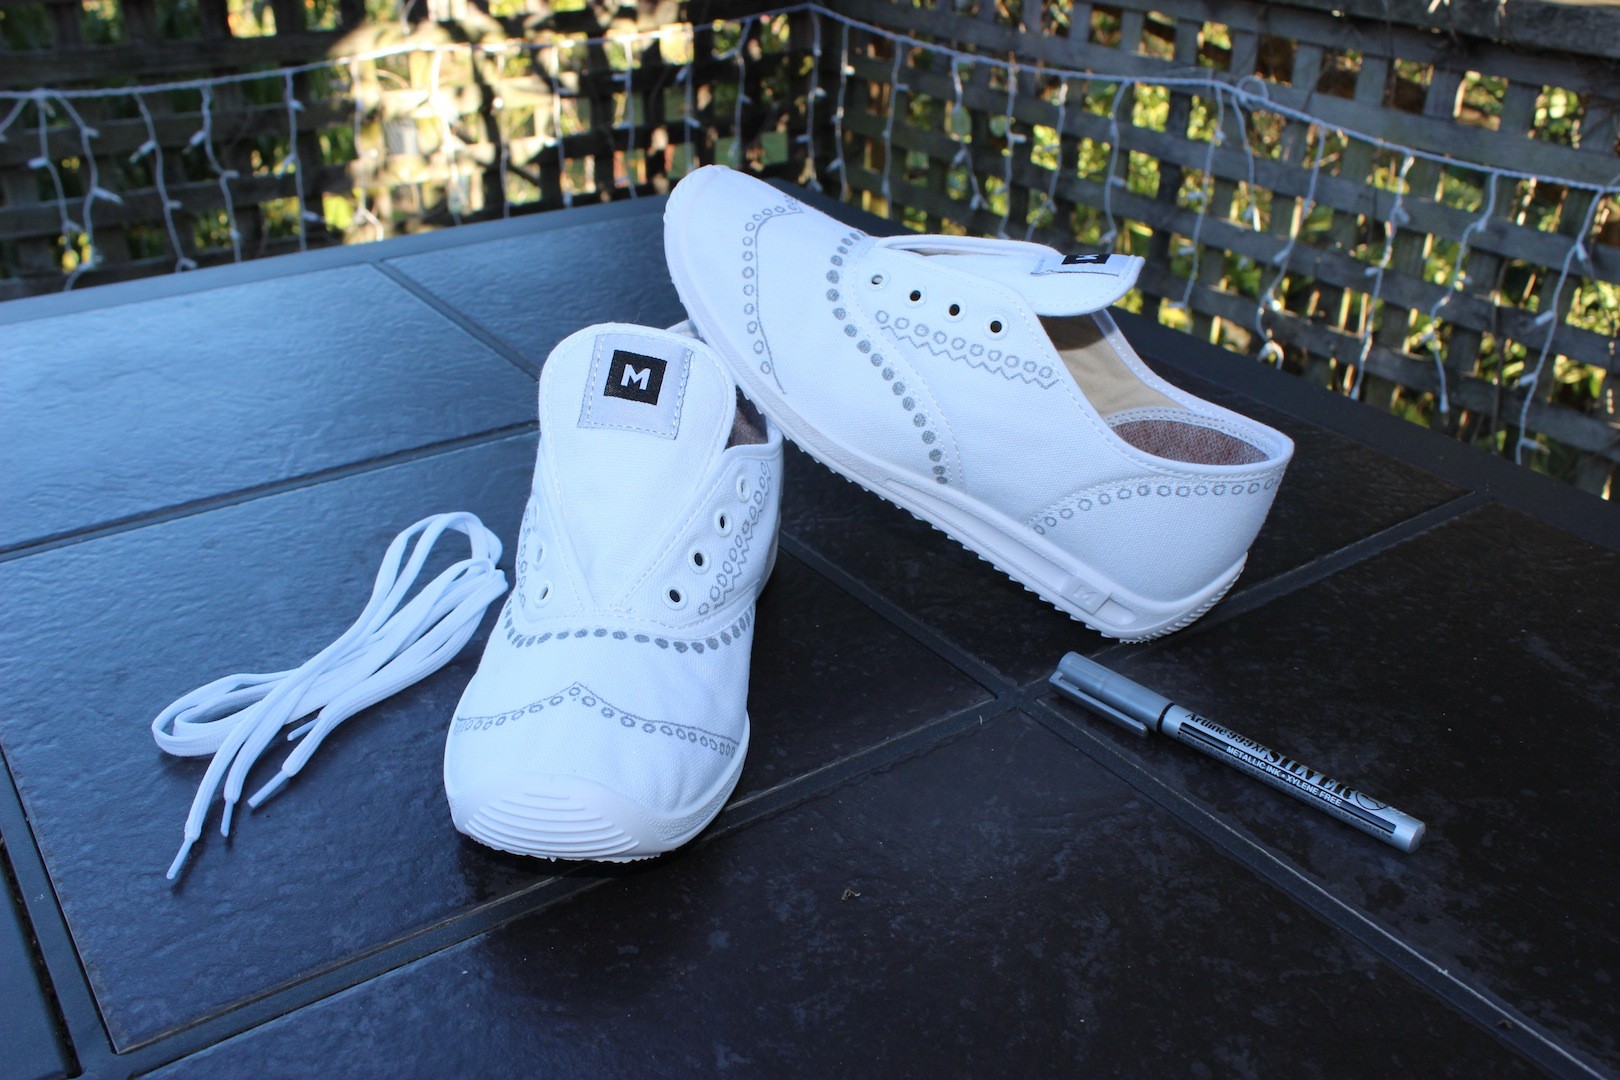
Your design should now be drawn out evenly across both shoes – something like this:
Commando-M Blogger Collab Kathryn Wilson Shoe Design
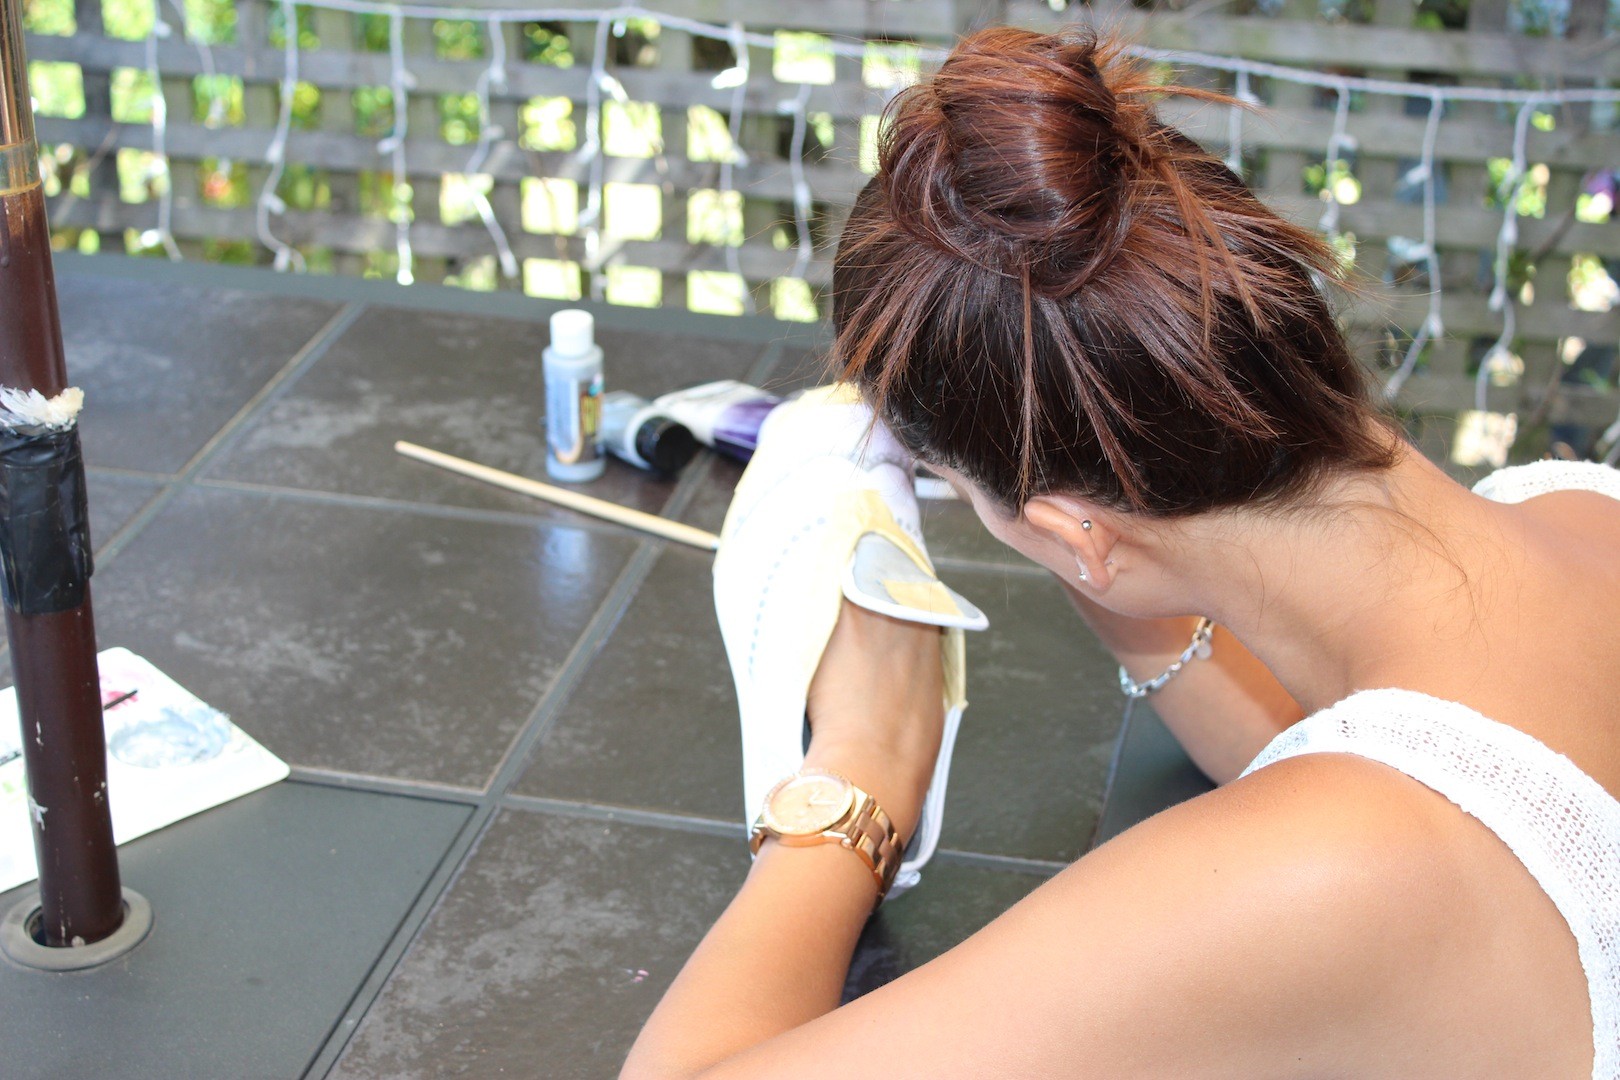
It’s time to start with the Masking Tape.  Basically you want to tape around all the parts of the shoe you DON’T want to get paint on.  I taped up the eyelets, the edges of the sole and around the edging close to where I was painting.
Commando-M Blogger Collab Kathryn Wilson Shoe Design
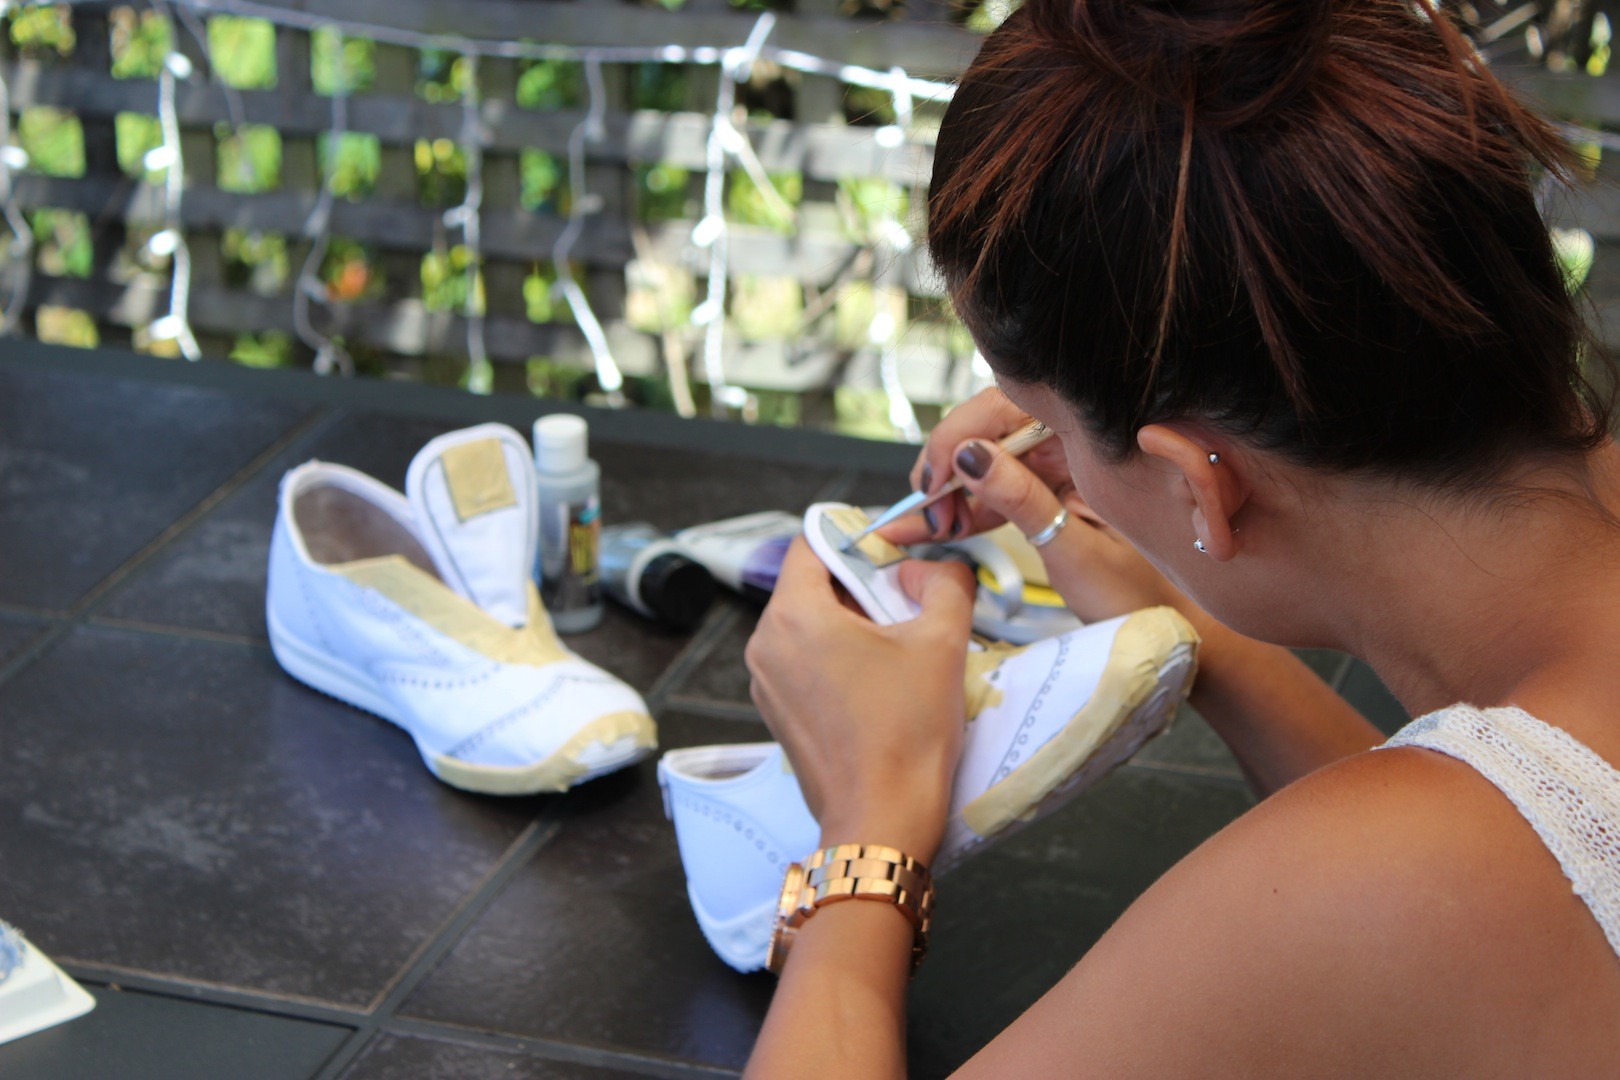
Now mix together your silver acrylic paint and iridescent mixing medium and start painting very carefully around the dotted design using a fine paintbrush (when painting the areas further away from the dotted design you can move to a larger paintbrush).
Commando-M Blogger Collab Kathryn Wilson Shoe Design
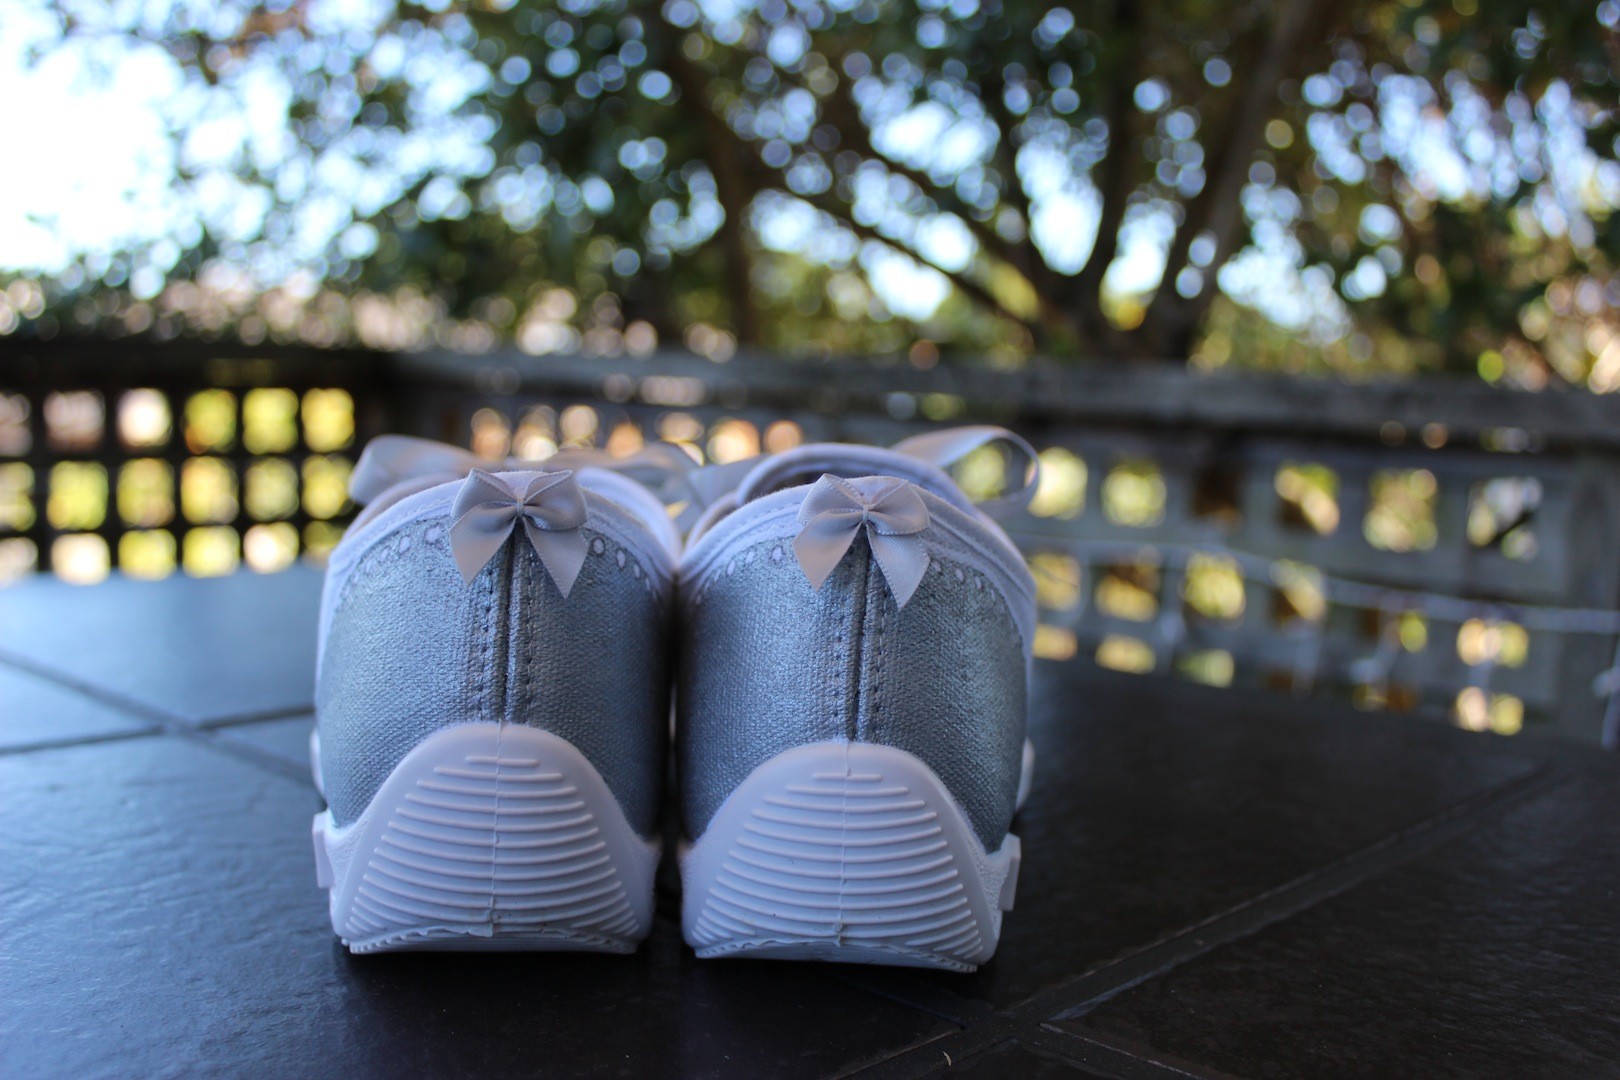
Allow paint to fully dry before removing the masking tape.  Add your finishing touches…. Take your silver ribbon, measure out the ribbon to the same size as the shoelaces you removed earlier and cut to size (I also lightly burnt the edge of the ribbon with a lighter to prevent fraying) and insert in place of the original shoelaces.  Create a small bow using the same silver ribbon and attach a bow onto the back heel of each shoe using quick drying Super Glue.
Commando-M Blogger Collab Kathryn Wilson Shoe Design
VOILA!  Oxford style sneakers.
Commando-M Blogger Collab Kathryn Wilson Shoe Design

Ange x
A Girl Interrupted By Fashion, Beauty & Anything Pretty That Catches My Eye
Don’t forget to ‘Like’ Gurlinterrupted on FACEBOOK and follow my blog by entering your email address on the homepage here on my site.

DIY Fashion Project: Trackie Pants to Cute Summer Boy Shorts (and there’s NO SEWING involved)…

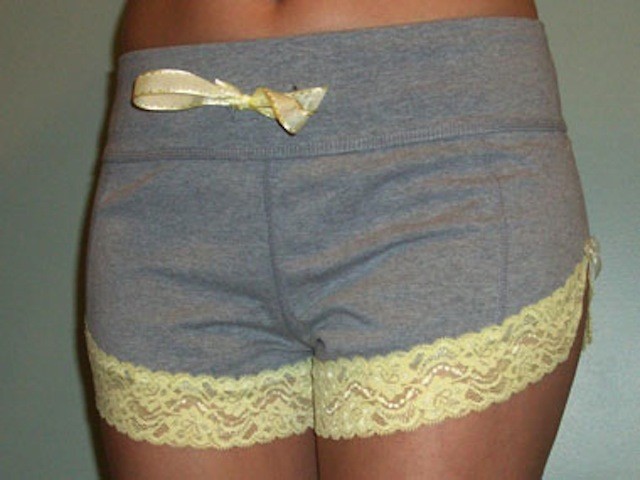
Strut into summer by turning your favourite pair of trackie pants into sizzling boy shorts. The best part is THERE’S NO SEWING INVOLVED!!

These boy shorts are the brainchild of US based lingerie designer, Jenny Dombroski of Evlove Intimates; and this simple tutorial will show you how you too can create your very own unique pair of super cute summer boy shorts.

Materials:
Trackie/Workout pants
Ruler
Chalk
Scissors
Hemming tape*
Lace trim*
Parchment paper*
Ribbon*
Iron and ironing board
Safety pin

*You can get these items from stores such as Spotlight, Geoffs Emporium, Craft Stores, etc

Step by Step:

  1. Lay the tracksuit pants flat and measure your desired length (the inseam should be between one and a half and three inches); adding a curved slit at the outer leg is optional. Draw the cut line with chalk.
  2. Fold the sweatpants in half lengthwise and cut from the inseam outward.
  3. Slide one leg of the shorts onto your ironing board. Line the hemming tape along the bottom edge and place lace on top, covering the tape. Put parchment paper over it all and iron for eight seconds to adhere the lace. Repeat with other leg.
  4. Remove drawstring from shorts. Replace with a ribbon (use the safety-pin to guide the ribbon through the gap where you removed the drawstring from.  The safety-pin will make it easy to guide the ribbon around).

And… Super Cute Boy Shorts Complete!!

Ange x
A Girl Interrupted By Fashion, Beauty & Anything Pretty That Catches My Eye
Want to be kept up to date on all the latest and greatest? Follow my blog by entering your email address on my homepage under “Stay Tuned, Follow My Blog”. xx

Photo: Courtesy of Evlove Intimates

Nail Art – How To Paint Nail Designs Perfectly On Both Hands!! (you don’t need to be ambidextrous)…

ImageSource: ChelleOnPinterest

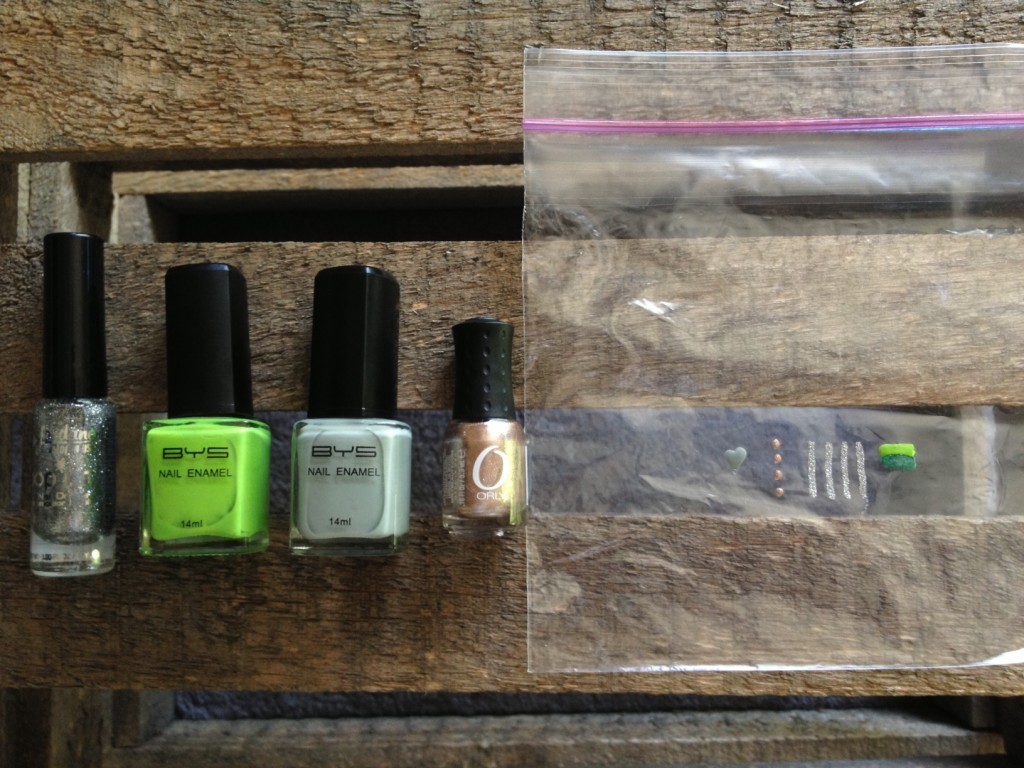
Ever wanted to paint pretty designs on your nails but found that it was impossible to DIY because you have one dominant hand that’s brilliant at drawing designs and the other hand that’s, well, not so much? Here’s a solution!  Prepare your designs before applying to your nails….

You will need:
Nail Polish
Ziploc BAg – like a sandwich bag or something similar (not cling wrap as it’s just too flimsy)
Clear Top Coat
A Hairdryer (if you’re impatient)
A Nail File

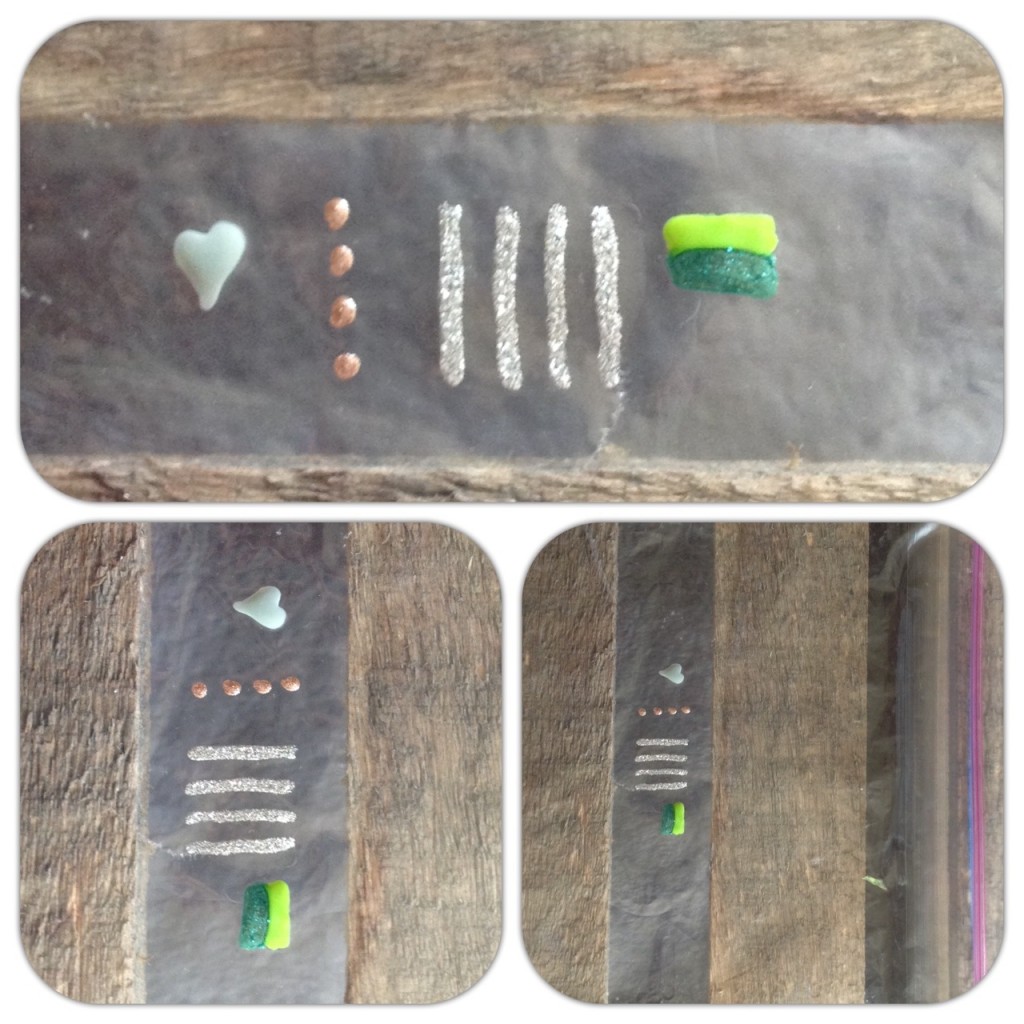
– First, paint your designs onto a Ziploc bag (as I’ve done in the below pics).  You will need to do fairly thick
coats and probably around 2 coats in total.
– Allow each coat to fully dry before applying the next coat (this is where you may want to use a hair dryer set
at ‘cool’)
– Apply a base coat to your nails
– Peel your designs off the Ziploc bag and place them on your nails
– Finish with a topcoat and viola – you’re done!

If you find that the design is hanging slightly over the end of your nail, use a nail file to gently file away any stray ends.  Then apply your top coat.

Happy DIY!

Want to be kept up to date on all the latest and greatest? Follow my blog by entering your email address on my homepage under “Stay Tuned, Follow My Blog”. xx

Ange x
A Girl Interrupted By Fashion, Beauty & Anything Pretty That Catches My Eye
How To Shuck A Strawberry Like A Boss….

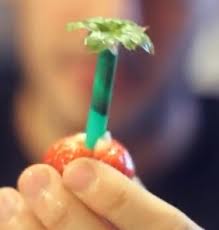
I think this is just genius!! I know what you’re probably thinking, ‘how hard can it be to pull the tops of strawberries?’ But this leaves the strawberry immaculately presented, which is fab for dinner parties, timely for Summer/Christmas gatherings, or when you’re popping a strawberry into a drink (mmmm champagne & strawberries) – they look so perfect!! Check out this super quick & easy ‘how to’ clip from young&reckless.com.

http://www.youngandreckless.com/blog/how-foodbeasts-shuck-a-strawberry/

I guess that’s why they call them ‘STRAW’berries huh! (I apologise for that – couldn’t resist!)

If you enjoyed this post – or are just enjoying my blog in general – enter your email address under “FOLLOW BLOG, STAY TUNED’ (situated on the right hand side of this article OR on my homepage), to ensure you get notified every time I upload a new article.

Ange x
A Girl Interrupted By Fashion, Beauty & Anything Pretty That Catches My Eye

Gold Collar Necklace – DIY Fashion Collar

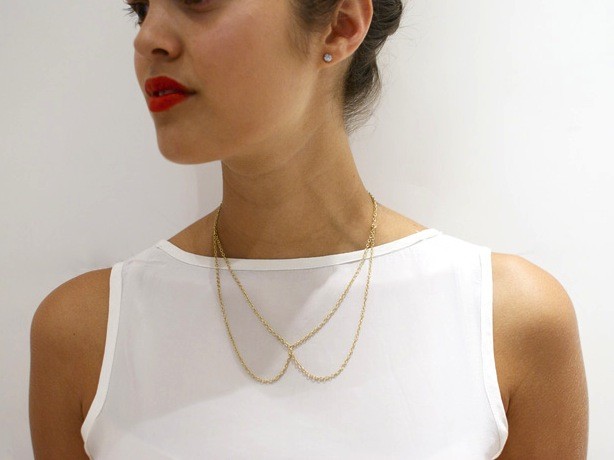
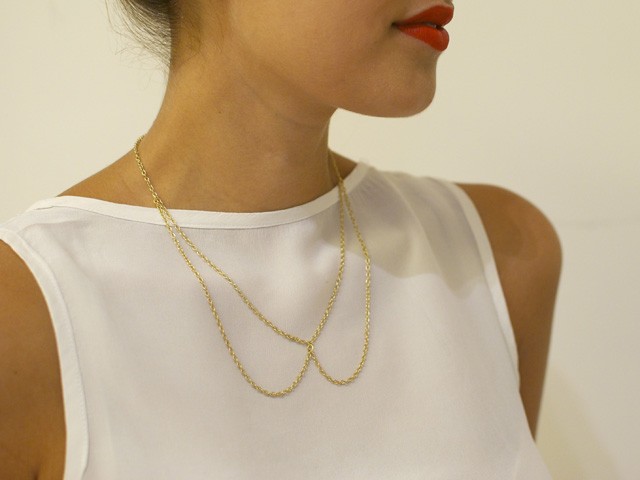
I’m fairly certain no one has overlooked the huge trend that is ‘Embellished Collars’.  They’re everywhere! And no doubt they’ll be here for at least another season. But to be honest – I’m a little over all the same ones I’m seeing in every store.  So, in my search for a new DIY fashion project; and to create something a little more subtle than the average embellished collar, I came across the perfect DIY article on http://www.harpersbazaar.com.au – A DELICATE CHAIN COLLAR – and thought I would share it with all of you.  I love the simplicity of this and it looks amazing worn over a top (especially something very simple and not too busy) yet looks just as good worn as a necklace directly against your skin.

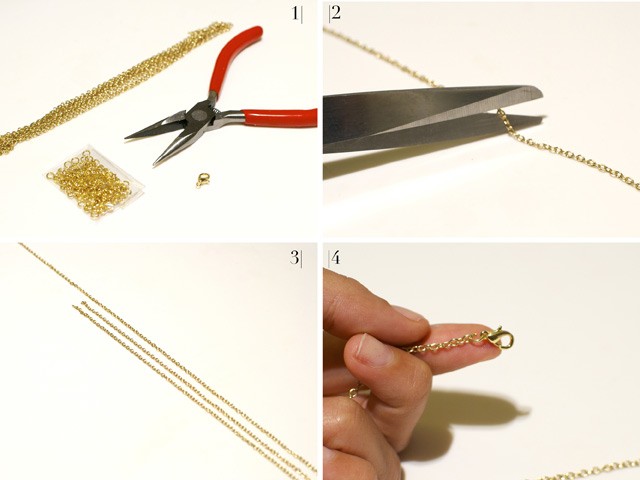
Here’s what you’ll need:
– Approx. 1 metre of delicate gold chain (or silver if you prefer)
– 1 lobster clasp
– 5 gold jump rings
– Beading pliers (admittedly – I just used plain old pliers
– Scissors
– Blue tack

STEPS:

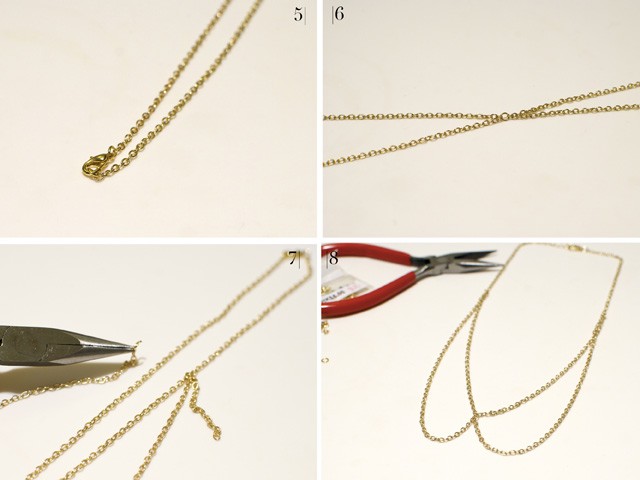
  • Cut your chain into 3 pieces. Cut one piece at around 50cm. Cut the other two pieces at around 25cm.
  • Creating the base of the necklace. Taking the longest (50cm) piece – attach a jump ring to one end and the lobster clasp to the other.
  • At the very centre of this 50cm chain – attach a jump ring. Then attach the two 25cm pieces of chain to this centre jump ring.
  • Put the necklace on. Looking in a mirror, hold up the ends of the two pieces of 25cm chain to see where you think the collar parts of chain should sit. This isn’t an exact science – just move the chains to the shape that you like the best. HANDY HINT: Put 2 little dots of blue tack on the ends of these chains before you hold them up to determine the shape, so that you can use the blue tack to mark where on the base of the necklace you want to attach the chains)
  • Remove the necklace and attach these remaining ends of chain with jump rings at the spot on the necklace that you marked with blue tack, to create the collar shape.

Voila – you’re done!! This is a really easy DIY project, resulting in a fresh spin on the embellished collar.  I sourced my items from Spotlight for next to nothing, however you could also check out Ikes/Geoffs Emporium as an alternative.

I Hope this inspires you to give the this DIY project a whirl.

If you enjoyed this post – or  are just enjoying my blog in general – enter your email address under “FOLLOW BLOG, STAY TUNED’ (situated on the right hand side of this article OR on my homepage), to ensure you get notified every time I upload a new article.

Ange x
www.gurlinterrupted.com
A Girl Interrupted By Fashion, Beauty & Anything Pretty That Catches My Eye
DIY – How to Make Your Own Clipless Curling Iron

DIY – Removing the Clip from Your Curling Irons

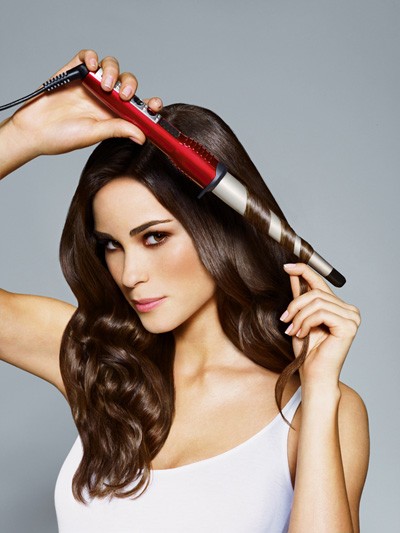
I love long ‘beachy waves’ created by using curling tongs, what I don’t love is the ‘weird little crimped bit at the end of your hair that seems to have a mind of it’s own’ caused by using a curling iron with a clip!  Now, I have a great curling iron (obviously aside from the fact it’s of the  ‘crimp making’ variety due to it having a clip); and  it wasn’t exactly cheap, so the last thing I wanted to do was go and spend more money on another curling iron so that I could have the clipless one (which for some reason, perhaps it’s because these are generally the ones used by hair stylists on celebrities, is remarkably pricier than a curling iron with a clip); and that’s when I decided to take to my curling iron with a Phillips screwdriver and DIY that bad boy into a clipless curling iron!

WHY IS A CURLING IRON WITHOUT A CLIP FAR SUPERIOR?

Benefits:

  • Less damage to your hair, aka, the dreaded split ends (caused by the ends of your hair being held the longest against the tong under the clip).
  • No creases, bumps or ‘weird crimpy bits’ from the where the clip was holding your hair; and that little bend in your hair gets heated into place, just like the curl does, so you know it’s there to stay around as long as the curl does.

So, since summer is nearly here, *YAY*, I decided its time to share my easy DIY guide to making your own ‘clip-free’ Curling Iron……


STEP ONE: Remove the clip-stand – this is easy, you literally just pull from one side and this will detach itself from the curling iron (some have small screws holding it in place, if this is the case, simply unscrew and remove)

image source: ImAlittle


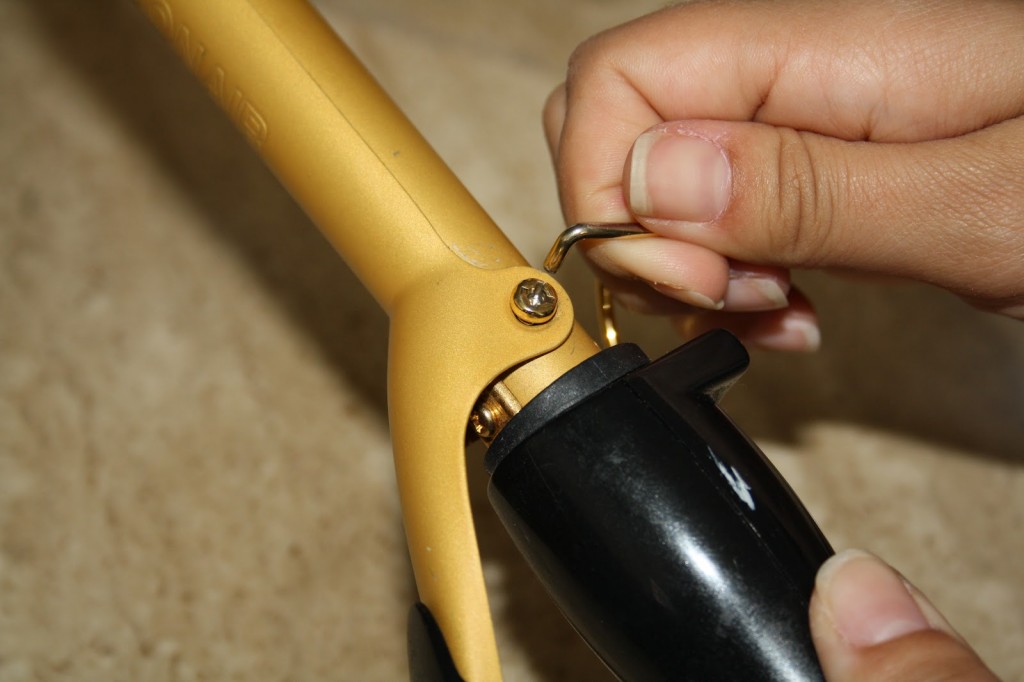
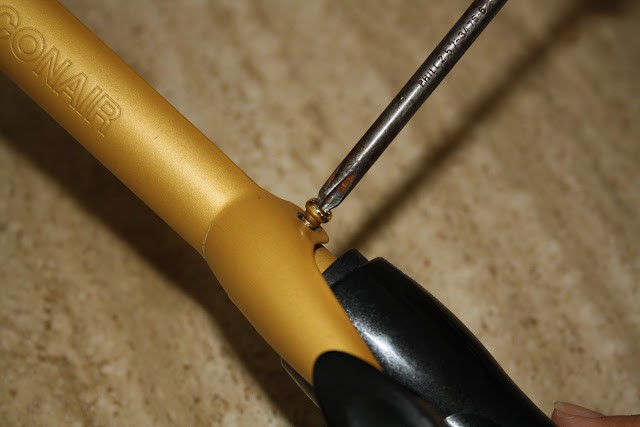
STEP TWO:  Remove the screws securing the clip (in most cases this can be done using a Phillips screwdriver)

image source: ImAlittle


STEP THREE: Remove the clip and spring (the spring is directly underneath the clip) from your curling iron

image source: ImAlittle

Voila!!  You have your very own Curling Wand (or Clipless Curling Iron if you so prefer); and can now create your perfect ‘Kardashian style beachy waves’.

You’re welcome 😉

Should you ever wish to reattach the clip to your curling iron, simply reverse the steps shown above, so keep all the parts together in a safe place for future use.

Ange x