Tag

style Archives - Page 3 of 4 - Gurlinterrupted

WIWT – Borrowing From My Guys Wardrobe….

When people say to me ‘describe your fashion style’, I can never narrow it down to one signature look.  I dress depending on my mood when I wake up in the morning and I like to mix up influences from street style, cinema and just whatever I conjure up in my head at the time.  I love boho chic, dressing girly, getting glammed up, and I would be lost without my super comfy boyfriend jeans. Another style I am quite partial to is an androgynous look, aka the ‘I raided my guys wardrobe’ look, is one of my favourites.

I’ve always lived by the mantra ‘money can’t buy style or class’ and with this in mind I love the challenge of hunting through a store I wouldn’t normally shop at, or a store that doesn’t stock designer/well-known brands (don’t get me wrong, I do love my designer brands too) with the aim of finding an item of clothing I can make work OR raiding my guys wardrobe to see what I can take from his wardrobe, to make work with mine – YEAH he’s finding out about this at the same time you are.  Thanks for letting me ‘borrow’ your shirt 🙂

What I Wore Today/OOTD……

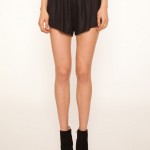
  1. MECCANO:  Striped Mens Shirt with ‘sleeve braces’ aka my guy’s shirt, which I decided I really love and had to wear on this warm yet overcast/rainy day.  It’s an XL Mens Shirt, so it’s a great length for shorts! I just adore the little sleeve braces – very preppy!! He has another shirt I have my eye on that I’m going to wear as a shirt dress with a little tan belt and sandals.
  2. Max: black shorts
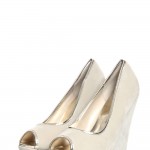
  3. Soda: Black and cork wedges
  4. Daniel Wellington: Watch (love love LOVE this watch!!)
  5. Karen Walker: Jewellery
  6. Boohoo.com: Tan studded bag
  7. Versace: Sunglasses

Ange x
A Girl Interrupted By Fashion, Beauty & Anything Pretty That Catches My Eye

Want to be kept up to date on all the latest and greatest? Follow my blog by entering your email address on my homepage under “Stay Tuned, Follow My Blog”. xx

The New Zealand Fashion Museum Presents: HOME SEWN

Last week, in between running to and from various New Zealand Fashion Week Runway Shows, I attended the Home Sewn Pop-up Exhibition and Book Launch held at the Nathan Gallery, 40 Customs St East, Britomart.  The Home Sewn exhibition is an amazing visual record of original home sewn fashion garments from the archives of women’s wardrobes from all around New Zealand with connections to New Zealand designers before they embarked on their fashion careers, plus sketches, illustrations, patterns, and the tools of home sewing.   The present is also featured at the exhibition with an outstanding collection of designs from young designers of fashion today.


The exhibition is also the launch pad for the New Zealand Fashion Museum’s latest book, HOME SEWN.   This is a stunning compendium of ten patterns from the luminaries of the fashion world in New Zealand, such as Company of Strangers, Cybèle, Katie-maree Cole, Lela Jacobs, Papercut, Starfish, TK Store, twenty-seven names, Vaughan Geeson and WORLD.  It profiles each designer’s personal experience along with sharing a pattern from one of their stunning collections and step by step instructions on how to make them. HOME SEWN provides an overview of our home sewing history by curator Doris de Pont, including a range of personal stories, beautifully illustrated with photographs by  Stephen Tilley.  Home Sewn RRP $45.


It’s well worth making the time to go along to the exhibition which is open now and runs through until 26 September, 10am – 5pm daily, Monday to Saturday (Sunday 11am – 4pm).  Entry is free; however a donation on entry is welcome.  To see more information on all the creative workshops they are running over the next couple of weeks, click on the attached link: www.fashionmuseum.org.nz or check out their facebook page: http://www.facebook.com/pages/New-Zealand-Fashion-Museum/126614904023061?sk=events 


Ange x

A girl interrupted by Fashion, Beauty and anything pretty that catches my eye

Is Nude The New Black?

image source: fashionbombdaily.com

Whether it’s playing the starring role or simply complimenting an already perfect outfit, nude is fast becoming a key wardrobe staple.

There is no better time than right now for nude (or neutral/beige/buff, whichever reference to the skin coloured hue you prefer) to make it’s mark on the fashion scene.  With neon, paisley, metallics and florals taking centre stage on the runway, nude pieces have never been such a wardrobe necessity.  It’s the perfect shoe colour compliment with a bright or ‘busy’ outfit, yet works just as well being the main colour base of your outfit, as you can add beautiful bright pops of colour using on-trend accessories.   I’m a huge fan of teaming nudes with black; and with some of the more feminine floaty pieces – these look great teamed with something a little harder, like a leather jacket and/or a pair of black biker style ankle boots.  it’s near impossible to get it wrong with nudes, because it simply goes with EVERYTHING!

Dark tones of nude make a perfect match for those with a darker skin complexion, whilst light nudes and rosy tones get along just fine with fair-skinned complexions.  Just be careful to pick nudes that aren’t an exact match with your skin color – but that’s pretty much the only rule when it comes to this chic muted tone.

Here are some of my favourite looks encompassing the lastest runway trends, mixed with nudes……

Still not convinced?   Did I mention that wearing flesh-tone heels will always make your legs look longer?

Ange x
Fashion, Beauty, Lifestyle blogger

images sourced L2R: ca.shine.yahoo.com, asos.com, capecodcollegiate.tumblr, fashionworship.com, decoycouture.tumblr, fashionworship.com, shopbop.com, stylishlymine.tumblr

DIY: Make Your Own BB Cream/Tinted Moisturiser

A Simple Guide To Making Your Own BB Cream/Tinted Moisturiser

If you’re wanting a fresh flawless light coverage that evens out your skin tone and gives you a glowing, healthy complexion without having to have a ’full blown, face full of makeup’ . Then a BB Cream might be just what you’re  after.

BB Creams (otherwise known as blemish balms or beauty balms) have been around for years and more recently have risen to a cult-like status in the beauty industry. They are essentially tinted moisturisers that give you a healthy glow, cover blemishes and even out your skin tone (perfect for summer!!).

A DIY BB Cream is actually incredibly easy to make and saves you the cost of purchasing more makeup when you will more than likely already have the basic ingredients at home. You can make it in small amounts (so it doesn’t expire before using it all) and its ‘made to match’ your skin tone perfectly by using your own foundation.

Here is a simple step by step guide to making your own.

Ingredients:

  • Sunscreen
  • Moisturiser
  • Liquid Concealer
  • Cream Foundation

I also add the following, but this is totally optional:

  • Lustre Drops (or mineral foundation powder)
  • A Setting spray

How to:
The brands I use, as outlined below, are simply what I have at home, this will still work perfectly using whatever brands you have.

In a small container (an empty tester pot, dipping bowl or ramekin is quite good), mix the following:

  • 1 teaspoon of sunscreen (not necessary if your current foundation already contains sunscreen as mine does)
  • 1 teaspoon of Kiehl’s moisturiser
  • 1/4 teaspoon of MAC liquid concealer
  • 1/4 teaspoon of MAC Lustre Drops (optional – I use this for a dewy finish)
  • 1/2 teaspoon of MAC Matchmaster Cream Foundation
  • 1/2 teaspoon of MAC Fix+ Setting Spray (optional)

Mix thoroughly and store in a small container or travel bottle (you can get great travel size containers from PlasticBox for $1.99) and VOILA – your very own, ‘made to match your skin tone’ BB Cream.

BB Cream is my current ‘go to’  beauty product right now and I’m loving not having to wear a full coverage foundation to achieve a glowy, fresh, flawless look.

Ange x
Fashion/Beauty/Lifestyle Blogger

Fashion Dipped in Metal

Image Source: lefashionimage.blogspot.com

Fashion Dipped in Metal……..

Many designers have taken to dipping their beautiful creations in liquid metal for Spring/Summer 2012/13, creating a wonderful mix of structured and floaty metallic masterpieces.

The great thing about metallics is that its a versatile trend that can be glammed up or dressed down. For a more casual look, this can be achieved by simply teaming a pair of jeans, a plain white t-shirt and blazer with a metallic clutch or metallic shoes. For a more glam look, a metallic dress teamed with a beautiful pair of nude heals achieves an effortless edgy look.

These are my key tips to wearing metallics without getting lost in a sea of metal:

  • Keep accessories to a minimum. Since metallics pack a significant punch all on their own, there’s no need to go overboard with accessories.
  • Pair your metallics with neutrals
  • Wear 1 metallic piece at a time

My current obsession is rose gold (Michael Kors Baguette-Bezel Rose Gold Watch – you shall be mine!!!!) so Im in heaven amongst the metallic trend that’s currently hitting the runways.  A few fab metallic finds:

Links to featured fashion brands:

boohoo: www.boohoo.com

Ruby: www.rubynz.com

TheIconicwww.theiconic.com.au

Wild Pair: www.wildpair.co.nz

CottonOn: www.CottonOn.com


Ange x

Fashion, Beauty, Lifestyle Blogger
www.gurlinterrupted.com

Beautiful Teardrops


Will You Be Going Crazy For Paisley? Paisley, the classic heritage print, is making its way back into the limelight in 2012! The twisted teardrop, named after a town in Scotland (the town of Paisley), hit the fashion scene when it first made its debut in the late 60′s/early 70′s. There was a resurgence of paisley again in the late 80′s early 90′s; and 2012 is set to be the biggest comeback yet, with paisley hitting runways around the globe!


Sourced: macaroonsandcupcakes.com Love it or hate it (I personally love paisley) there will be no avoiding this print-astic pattern as it swirls its way into spring. The great thing about fashion in 2012 is there really are no ‘rules’.  If you’re feeling bold and confident you can mix your paisley with another fab print like stripes or polka dots. Who says you can’t combine your prints?!  If you tend to lean towards a safer option, combine your paisley with a single coloured piece of clothing, or just add a dash of paisley to your wardrobe with a simple accessory such as a scarf, or if you’re lucky enough to find them in paisley, a pair of shoes.

Below are a few of my key paisley picks.  Keep an eye out in-store and online for your key paisley picks for Spring/Summer 2012 and leave a comment below to let me know where you’ve discovered your ‘paisley fashion fav’!

Ange x

Shirt Dress from boohoo.com

Ombre Paisley Pinafore Dress from Top Shop

Paisley Print Naomi Relaxed Trousers from boohoo.com

Scroll Kaftan from ukaccessories.com

Karen Walker Dress – Sea Monsters Collection

FINDATION


As I was browsing through www.nzgirl.co.nz the other day I came across a fantastic article aptly named FINDATION.  As soon as I read about a website that can match your current foundation to numerous brands, solely based on foundations that you already own and know are the right shade for your skin tone, I was hooked and had to find out more!

www.findation.com is GENIUS!!

I cannot count the number of times I have been frustrated by buying the wrong colour foundation.  Sure, in the tiny mirrors and bad lighting of a store, its easy to be fooled into thinking you have the right shade of foundation, but head my warning – you will never get the correct foundation match in unnatural lighting, ever!  There have been many occasions where I’ve tried foundation on my jaw line, nose, back of hand, wrist, cheek (need I go on – basically I looked ridiculous in several streaks of colour), thought I’d chosen the correct shade and then hit the natural light of day only to realise that it is in no way, shape or form, the right colour at all!

Then there’s the brands that you’d love to buy, but can only get online and thus have no idea what shade to even start to contemplate as your match as you can’t colour swatch foundation online now can you?!  StrawberryNet has an amazing array of foundation brands that you can’t normally get your hands on in NZ and at incredibly affordable prices, however, it’s not exactly saving money when you buy a foundation that is completely the wrong colour for you with.  Enter…….. www.findation.com.

It’s so simple and from my experience with Findation, pretty damn accurate!  You basically enter the site, it asks you to input 3 or 4 brands you have used or are using currently (even including BB Creams) that you are happy with.  It will then bring up all the varieties within that brand along with all the shades within that tier and you hit the ‘Find My Matches’ button.  In about 2 seconds you are presented with an amazing array of all the foundation brands and shades that match you skin tone without even leaving your computer (or entering a badly lit store)!

Head along and check it out.  I loved it and thought you might too

Ange x


Sigma – Make Me Classy

Make-up brushes are THE essential tool for makeup artists, but in my opinion, they’re an essential tool for ANYONE wanting to properly apply their makeup.  So I thought I would share my favourite brushes with you!!  It can be quite daunting knowing which brushes to choose and which brushes are worth spending your hard-earned cash on.   For me personally, I am a HUGE fan of the US brand – Sigma; and although I’m often heard stating “I have MAC pumping through my veins” (I stand by that statement by the way), I have to say that in all honesty Sigma really do have equally good brushes at a fraction of the price  (that being said, I will never part with the infamous MAC217).

When looking to buy my first set of ‘professional makeup brushes’ I found it was just too expensive for me to purchase all the brushes I wanted in the MAC range (at NZ$40-$50 per eye-shading brush, this can be a little unobtainable for most people).  So after weeks of trawling the net and ’email quizzing’ friends in the industry overseas, I decided to give Sigma brushes a go; and I havent looked back since.

SO, WHAT ARE MY FAV BRUSHES……… the Sigma ‘Make Me Classy’ Essential Kit. 12 brushes in total that come in a uber cool brush case that protects your brushes from being damaged when you are travelling (this particular set comes with case) and converts into 2 brush holders when you’re at home or have reached your destination.

Whilst I realise that NZ$136 may sound like a lot of money, trust me, for a set of professional brushes, it’s actually not too bad at all. (shipping from the US to NZ costs an additional $17).

The brushes included are:

E05 – Eye Liner: Create smooth and even lines. Use with gel or liquid liners.
E30 – Pencil: Soften and smoke out lines. Soften pencil liners along the top and bottom lash lines, add shadow to line the eyes, or use to highlight inner corner of eyes.
E40 – Tapered Blending: Soft blended crease. Using just the tips to apply color, sweep back and forth through the crease for a diffused and blended finish.
E55 – Eye Shading: Even application of color. Place color across the whole lid for an even and strong application of product.
E60 – Large Shader: Uniformly cover the whole lid with product. Apply cream shadow base or cream shadow for quick and even coverage.
E65 – Small Angle: Create precise lining. Moves fluidly and easily across the upper and lower lash lines. Use with gel, cream or powder liners.
E70 – Medium Angled Shading: Soft application of color. Use for brow highlighting or to blend the crease.
F30 – Large Powder: Even powder application. Uniform blending of powder products onto the face and body.
F40 – Large Angled Contour: Subtle cheek application. Use the angle to softly contour the cheekbone. Can also be used to apply blush.
F50 – Duo Fibre: Creates an airbrushed effect onto the skin. Can be used with powder, liquid or cream products.
F60 – Foundation: Smooth foundation application. Apply liquid or cream products such as foundation and primer.
F70 – Concealer: Conceal small areas. Conceal the hardest to reach areas such as around the nose and eyes.
You can also choose from a range of super cute colours, such as the Mrs Bunny kit (there’s even a Mr Bunny Kit), Make Me Crazy Kit, plus a load more colours.


So head along and check it out www.sigmabeauty.com – however, this link comes with a warning – you will be tempted by many eye shadow palettes and a heap of cool accessories!!
Ange xx
PS:  There’s also a code which you can use to get 10% off your purchase, just enter: AP2012 when going through the ‘checkout’ (valid till July 31).

Smoke Signals from Urban Decay

I’m SUPER excited to write this blog because, A) its makeup and, well, I’m obsessed; and B) I get to write the words (which of course makes it real, that’s the rules right?  Say it out loud/write it down, its real!).  I digress…….”Urban Decay have released a NEW PALETTE!!”  Not just any palette, no it’s not NAKED3 , because let’s be honest, NAKED2 was a little underwhelming and felt a bit like it was just 1 hue away from the original NAKED palette.

Urban Decay have released……….. SMOKED

Yes I have MAC Cosmetics pumping through my veins, however, I do adore Urban Decay just as much and in particular, my Urban Decay NAKED palette.  The trusty NAKED palette is the first thing I pack when travelling (heck it’s the ONLY palette I need to pack) and the first thing I reach for when I have little time to spend on my makeup but still want to create a simple smokey daytime eye in record time!  So when UD announce they are releasing a new palette (released in the US/UK this week), with new colours inc. jewel toned hues no less, I’m excited!!

So, what does the  Urban Decay SMOKED palette have to say for itself:

SMOKED

EYESHADOW PALETTE

This is the smoky eye done the UD way: a true range of shades (Neutral mattes! Shimmering jewel tones!) for a range of smokey looks.

We’re giving you everything you need to create the perfect smoky eye, Urban Decay style. Zipped inside this sleek, mirrored case are ten decadent shades (five are exclusive), including neutral mattes and shimmering jewel tones for a range of smoky looks. Sure, you can create a smoky eye with a range of gray and black shades. But what about a touch of purple, blue or bronze? The Smoked Palette lets you keep things simple… or get a little more creative. (TIP: If you need a basic daytime look, stick to the range of matte neutrals. Throw the palette in your bag, and add some smoke as you leave the office.)

Our secret smoky eye weapon? A blacker-than-black matte pencil. Included with the Smoked Palette is a full-size 24/7 Glide-On Eye Pencil in Perversion, AND a travel-size Eyeshadow Primer Potion.

Also included is a beautifully illustrated, step-by-step guide to 12 smoky eye looks, written by Urban Decay founder Wende Zomnir. Both smoky-eye pros and shadow newbies will benefit from this detailed guide to looks from “iconic” to “smoldering” to “reality star”.

A “non Urban Decay Marketing speak” breakdown of each colour:

Kinky (a new soft ivory peach with a matte finish), Freestyle (a new light pantyhose nude with a matte finish), Mushroom (a repromoted warm gray with a shimmery finish – LOVE!!), Backdoor (I shall resist the urge to make a joke here……a new true dark brown with a matte finish), Blackout (a repromoted blackest black with a matte finish), Barlust (a new dark golden brown with a metallic finish), Rockstar (a repromoted deep aubergine with a shimmery finish), Evidence (a repromoted deep navy blue with a shimmery finish), Loaded (a repromoted deep emerald shimmer with a metallic base), Asphalt (a new deep gunmetal with silver micro glitter and a metallic base) and Perversion (a repromoted matte carbon black).

So , excited yet?  I am!!  Now to just get this bad boy in my hot lil hands.  Well its on its way as I type this blog (thank you Nat – you little PR Guru – and fabulous makeup buying friend – you).  I will be sure to blog swatches and give a full review the moment this palette arrives!

RRP around NZ$90 


The Colour Wheel

colorwheel2

The Colour Wheel – this is as much of a wardrobe staple as the LBD, only, BRIGHTER!!

So, I don’t know about you guys, but me, I hear this sentence a lot when I’m out shopping……”I love this colour but it really won’t go with anything in my wardrobe” (maybe you’ve even said it yourself?!). Or, “this colour top/pants/skirt is gorgeous, buuuut, I’ll just buy it in black because black goes with everything”.  Enter, the Colour Wheel…..

This is a quick and easy guide to ALWAYS knowing what colours to team together and which ‘colour opposites’ attract!  To get started here are some easy steps to using the Colour Wheel. These combinations are the perfect ‘colour partners’ on the wheel:

1. Colours that form a 90 degree right angle with each other. e.g. green & orange; violet-red & blue; red-orange & yellow.

2. Colours that are directly next to each other. e.g. green & blue-green; yellow & orange-yellow; violet & blue-violet (basically, any colour directly next to each other goes, clockwise or anti-clockwise).

3. Colours that form a ‘T’  e.g. orange, blue & violet-red; yellow, violet & blue-green (you get the picture).

4. Colours directly across from each other. e.g. orange & blue; red & green; orange-yellow & blue-violet.

5. Colours that form an ‘X’  e.g. yellow-green, blue, orange, violet-red or orange, blue, violet, yellow.

Given brown is a neutral, rest assured it will go with pretty much any colour on the Colour Wheel.  As will black and white.

So, when you choose an item of clothing in a colour that has you a little baffled as to what you should partner it with, find it on the Colour Wheel and use the steps listed above to find it’s perfect colour combo!

For accessories, team gold toned jewellery with ‘warm’ coloured outfits and silver toned jewellery with ‘cool’ coloured outfits (using the ‘Warm/Cool’ Wheel below).


Happy Colour-Combining xx