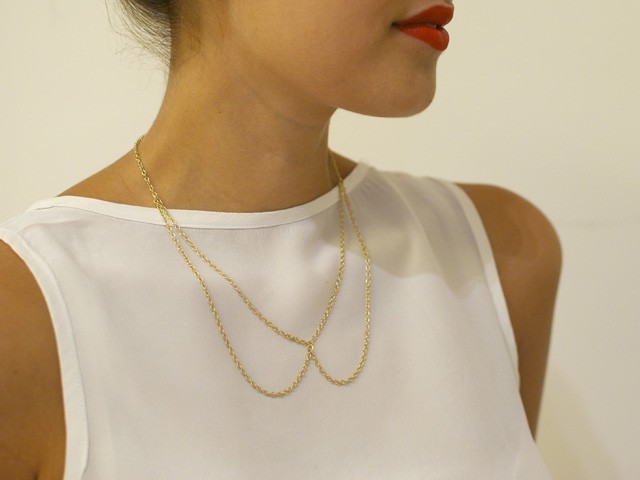

I’m fairly certain no one has overlooked the huge trend that is ‘Embellished Collars’. They’re everywhere! And no doubt they’ll be here for at least another season. But to be honest – I’m a little over all the same ones I’m seeing in every store. So, in my search for a new DIY fashion project; and to create something a little more subtle than the average embellished collar, I came across the perfect DIY article on http://www.harpersbazaar.com.au – A DELICATE CHAIN COLLAR – and thought I would share it with all of you. I love the simplicity of this and it looks amazing worn over a top (especially something very simple and not too busy) yet looks just as good worn as a necklace directly against your skin.
Here’s what you’ll need:
– Approx. 1 metre of delicate gold chain (or silver if you prefer)
– 1 lobster clasp
– 5 gold jump rings
– Beading pliers (admittedly – I just used plain old pliers
– Scissors
– Blue tack


STEPS:
- Cut your chain into 3 pieces. Cut one piece at around 50cm. Cut the other two pieces at around 25cm.
- Creating the base of the necklace. Taking the longest (50cm) piece – attach a jump ring to one end and the lobster clasp to the other.
- At the very centre of this 50cm chain – attach a jump ring. Then attach the two 25cm pieces of chain to this centre jump ring.
- Put the necklace on. Looking in a mirror, hold up the ends of the two pieces of 25cm chain to see where you think the collar parts of chain should sit. This isn’t an exact science – just move the chains to the shape that you like the best. HANDY HINT: Put 2 little dots of blue tack on the ends of these chains before you hold them up to determine the shape, so that you can use the blue tack to mark where on the base of the necklace you want to attach the chains)
- Remove the necklace and attach these remaining ends of chain with jump rings at the spot on the necklace that you marked with blue tack, to create the collar shape.
Voila – you’re done!! This is a really easy DIY project, resulting in a fresh spin on the embellished collar. I sourced my items from Spotlight for next to nothing, however you could also check out Ikes/Geoffs Emporium as an alternative.

I Hope this inspires you to give the this DIY project a whirl.
If you enjoyed this post – or are just enjoying my blog in general – enter your email address under “FOLLOW BLOG, STAY TUNED’ (situated on the right hand side of this article OR on my homepage), to ensure you get notified every time I upload a new article.
Ange x
www.gurlinterrupted.com
A Girl Interrupted By Fashion, Beauty & Anything Pretty That Catches My Eye